


PC overheating during long gaming? Best cooling tips and fan setup strategies.

The thrill of an immersive gaming session can quickly turn into frustration if your PC starts to overheat. High temperatures not only lead to performance drops and stuttering but can also cause system crashes and significantly reduce the lifespan of your valuable hardware. Understanding why your PC overheats and implementing effective cooling strategies is crucial for maintaining a stable, high-performing gaming rig.
Understanding PC Overheating
At the heart of every gaming PC, the Central Processing Unit (CPU) and Graphics Processing Unit (GPU) generate substantial heat during intense operations. If this heat isn’t efficiently dissipated, temperatures rise, causing components to throttle performance (reduce clock speed) to prevent damage. Common culprits for poor heat dissipation often include dust accumulation, inadequate airflow, degraded thermal paste, and insufficient cooling hardware.
Common Culprits Behind Overheating
- Dust Accumulation: Dust acts as an insulating layer on heatsinks and clogs fans, severely impeding heat transfer.
- Poor Case Airflow: Incorrect fan placement or an unoptimized fan setup can trap hot air inside the case.
- Degraded Thermal Paste: Over time, the thermal paste between your CPU/GPU and their respective coolers can dry out and lose effectiveness.
- Inadequate Cooling Hardware: Stock coolers or entry-level cooling solutions may not be sufficient for high-performance components under heavy loads.
- High Ambient Temperatures: The room temperature significantly impacts your PC’s ability to cool itself.
Essential Cooling Tips for a Stable Gaming PC
1. Dust Regularly and Maintain Cleanliness
This is perhaps the simplest yet most effective cooling tip. Dust is the enemy of efficient cooling. Over time, it builds up on fan blades, heatsink fins, and inside vents, creating an insulating barrier that traps heat. Regular cleaning with compressed air can dislodge dust from these critical areas, allowing air to flow freely and components to cool properly.
Beyond dusting, ensure good cable management within your PC case. Messy cables can obstruct airflow, creating ‘dead zones’ where hot air becomes stagnant. Tying cables neatly behind the motherboard tray or along the case edges helps maintain clear pathways for air.
2. Optimize Your Fan Setup and Airflow
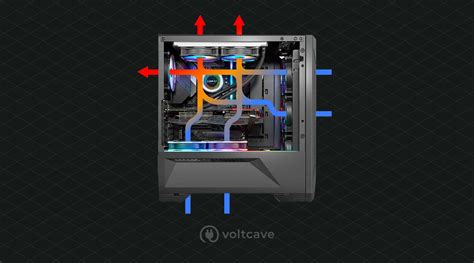
The strategic placement of case fans is vital for creating an effective airflow path. Generally, you want to create a flow where cool air is drawn in from the front and bottom of the case, and hot air is exhausted from the back and top. This helps create a unidirectional airflow that efficiently moves heat out of the system.
Consider the concept of positive and negative air pressure. Positive pressure (more intake than exhaust) helps prevent dust from entering through unfiltered vents, while negative pressure (more exhaust than intake) is effective at quickly removing hot air, though it can draw in more dust. A balanced or slightly positive pressure system is often ideal for most users.
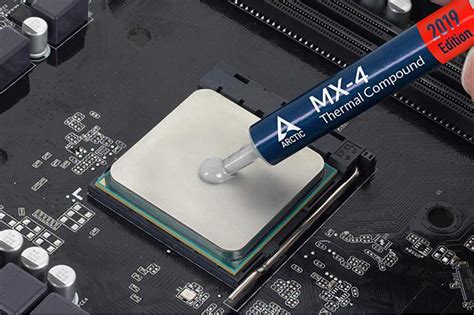
3. Reapply Thermal Paste
Thermal paste acts as a heat-transfer medium between the CPU/GPU die and the cooler’s baseplate, filling microscopic imperfections to ensure maximum contact. Over several years, this paste can dry out and degrade, reducing its effectiveness. Reapplying fresh, high-quality thermal paste can significantly improve thermal conductivity and lower temperatures, especially on older systems or after installing a new cooler.
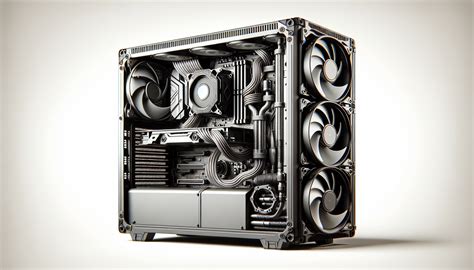
4. Upgrade Your Cooling Hardware
If your components are still running hot despite cleaning and fan optimization, it might be time for a hardware upgrade. Consider a more powerful CPU cooler, such as a high-performance air cooler or an All-in-One (AIO) liquid cooler, especially for overclocked or high-end CPUs. Upgrading stock case fans to higher RPM or static pressure fans can also dramatically improve airflow and cooling efficiency. For cases with poor airflow, investing in a case with better ventilation and fan mounting options is a worthwhile upgrade.
5. Monitor Temperatures and Adjust Settings
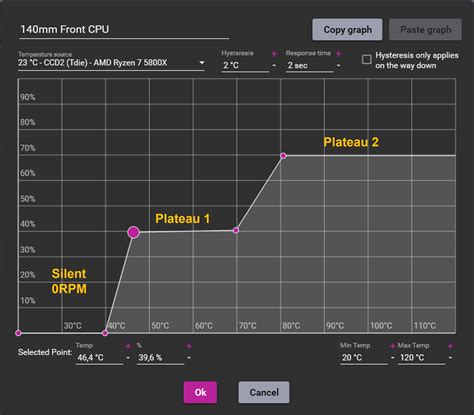
Knowledge is power when it comes to PC temperatures. Use monitoring software like HWMonitor, MSI Afterburner, or NZXT CAM to keep an eye on your CPU and GPU temperatures during gaming. Understanding your average and peak temperatures allows you to identify problems quickly. Some utilities also allow you to create custom fan curves, so your fans spin faster when temperatures rise, providing dynamic cooling tailored to your system’s needs. For advanced users, undervolting your CPU or GPU can reduce power consumption and heat output with minimal performance impact.
Advanced Fan Setup Strategies for Optimal Performance
Beyond basic intake and exhaust, consider the types of fans you’re using. Static pressure fans are designed to push air effectively through restrictive obstacles like radiators or tight heatsink fins, while airflow fans are better at moving large volumes of air in open areas. Placing static pressure fans on your radiator and airflow fans for general case intake/exhaust can fine-tune your cooling. Furthermore, experiment with fan speeds using software to find the optimal balance between cooling performance and noise levels, creating fan curves that react appropriately to different system loads.
Conclusion: Keep Your Cool, Game On
Preventing PC overheating during long gaming sessions is a multi-faceted approach involving regular maintenance, smart fan configuration, and potentially hardware upgrades. By proactively addressing these aspects, you can ensure your gaming rig runs cooler, quieter, and more reliably, allowing you to enjoy uninterrupted, high-performance gaming for years to come. Don’t let heat be the bottleneck to your gaming prowess – keep your PC cool, and game on!


