


How do I correctly set up my high refresh rate gaming monitor for minimal input lag and smooth visuals?

Unlocking Your Monitor’s Full Potential
A high refresh rate gaming monitor is a significant investment aimed at providing a competitive edge and a more immersive visual experience. However, simply plugging it in isn’t enough to harness its full capabilities. Proper configuration across multiple layers—from physical connections to software settings—is crucial for minimizing input lag and achieving the buttery-smooth visuals you paid for. This guide will walk you through the essential steps to correctly set up your high refresh rate monitor.
1. Ensure the Correct Physical Connection and Cable
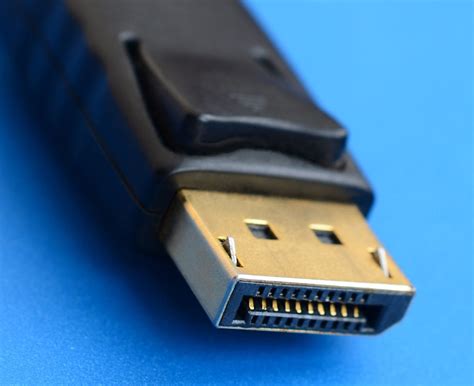
The first step is often overlooked but critical. For refresh rates above 60Hz and resolutions beyond 1080p, DisplayPort (DP) is almost always the superior choice over HDMI. DisplayPort offers higher bandwidth, which is necessary for high refresh rates and resolutions, and is generally required for NVIDIA G-Sync. For AMD FreeSync, both DisplayPort and HDMI can often work, but DP remains the more robust option.
- DisplayPort (DP): Use a high-quality DisplayPort 1.4 or higher cable to connect your monitor to your graphics card. Ensure it’s securely plugged in at both ends.
- HDMI: If you must use HDMI, ensure it’s HDMI 2.0 (for 1080p @ 240Hz, 1440p @ 144Hz) or HDMI 2.1 (for 4K @ 120Hz+). Not all HDMI cables are created equal; invest in a certified “High Speed” or “Ultra High Speed” cable.
2. Configure Your Operating System Display Settings
Your operating system won’t automatically use the highest refresh rate your monitor supports. You need to set it manually.
For Windows:
- Right-click on your desktop and select “Display settings.”
- Scroll down and click “Advanced display settings.”
- Select your gaming monitor from the dropdown menu (if you have multiple displays).
- Click “Display adapter properties for Display [Monitor Name].”
- Go to the “Monitor” tab.
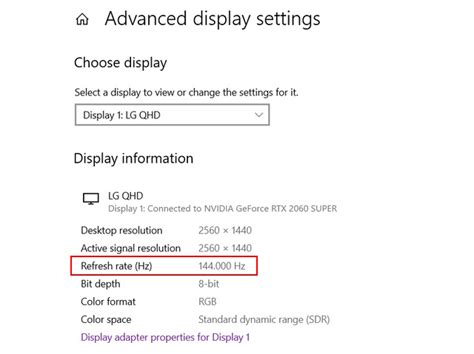
- Under “Screen refresh rate,” choose the highest available refresh rate (e.g., 144Hz, 165Hz, 240Hz).
- Click “Apply” and then “OK.”
For macOS:
- Go to System Settings (or System Preferences).
- Click on “Displays.”
- Select your external gaming monitor.
- Under “Refresh Rate,” choose the highest available option. You may need to hold the Option key while clicking “Scaled” to see more resolution and refresh rate options.
3. Optimize Your GPU Control Panel Settings
This is where the magic for input lag reduction and adaptive sync happens.
NVIDIA Control Panel:
- Right-click on your desktop and select “NVIDIA Control Panel.”
- Under “Display,” go to “Change resolution.” Ensure your native resolution and highest refresh rate are selected.
- Under “Display,” go to “Set up G-SYNC, G-SYNC Compatible.”
- Check “Enable G-SYNC, G-SYNC Compatible.”
- Select your display.
- Check “Enable for full screen mode” (and optionally “Enable for windowed and full screen mode” if desired).
- Under “3D Settings,” go to “Manage 3D settings.”
- Low Latency Mode: Set to “On” or “Ultra.” “Ultra” aims to submit frames just in time for the GPU to process, minimizing queueing.
- Max Frame Rate: Set this to 3 frames below your monitor’s maximum refresh rate (e.g., 141 FPS for a 144Hz monitor). This helps keep you within the G-SYNC range and avoids V-Sync penalties.
- Vertical sync: Set to “On” if using G-SYNC/FreeSync AND you’ve set a max frame rate cap. This prevents screen tearing above your refresh rate while G-SYNC handles it below. Otherwise, set to “Off” or “Fast” (Fast V-sync can reduce tearing above refresh rate but has higher latency than G-SYNC/FreeSync).
AMD Adrenalin Software:
- Right-click on your desktop and select “AMD Radeon Software.”
- Go to the “Gaming” tab, then “Displays.”
- Ensure “Radeon FreeSync” is set to “Enabled.”
- Go to the “Gaming” tab, then “Global Graphics.”
- Radeon Anti-Lag: Set to “Enabled.” This reduces input lag by managing CPU work ahead of the GPU.
- Radeon Chill: Consider enabling and setting a max FPS limit just below your monitor’s refresh rate for power saving and consistent frame times.
- Enhanced Sync: Generally keep this off if FreeSync is enabled. It’s an alternative to V-Sync with lower latency but can introduce stuttering.
- Vertical Refresh: Set to “Enhanced Sync” or “Always Off” if FreeSync is enabled and you’ve capped FPS. Otherwise, “Off” is generally preferred for lowest input lag if not using adaptive sync.

4. Adjust In-Game Settings for Optimal Performance
Even with system-wide settings configured, games can override or introduce their own performance inhibitors.
- In-game V-Sync: If you’re using G-SYNC or FreeSync with a frame rate cap and V-Sync enabled in your GPU control panel, disable V-Sync within the game itself. Enabling both can introduce unnecessary lag.
- Frame Rate Limiters: Some games have built-in FPS limiters. If you’ve set a global limit in your GPU control panel, ensure the in-game limiter isn’t set higher than your desired cap (or just disable it).
- Display Mode: Always run games in “Fullscreen Exclusive” mode if available, as it generally offers lower input lag than “Borderless Windowed” or “Windowed” modes.
5. Tweak Monitor OSD (On-Screen Display) Settings
Your monitor itself often has settings that impact responsiveness and visuals.
- Overdrive / Response Time: Most gaming monitors have an “Overdrive” or “Response Time” setting. Experiment with different levels. Too low, and you’ll see ghosting; too high, and you might experience “inverse ghosting” or “overshoot.” The “medium” or “normal” setting is often the best balance.
- Adaptive Sync Toggle: Some monitors require you to manually enable FreeSync/G-Sync Compatible in their OSD. Check your monitor’s manual.
6. Verify and Test Your Setup
After all these adjustments, it’s essential to verify everything is working as intended.
- Refresh Rate Test: Visit websites like TestUFO to confirm your monitor is running at its advertised refresh rate.
- Adaptive Sync Test: Some GPU drivers have built-in tests, or you can use tools like the NVIDIA G-SYNC Pendulum Demo to confirm G-SYNC/FreeSync is active.
- Actual Gameplay: Load up your favorite fast-paced game and pay attention to fluidity and responsiveness. Make minor adjustments as needed.
Conclusion: The Pursuit of Perfection
Setting up your high refresh rate gaming monitor correctly is a multi-step process, but the payoff is immense: a significantly more responsive and visually fluid gaming experience. By meticulously configuring your physical connections, operating system, GPU control panel, in-game settings, and monitor OSD, you’ll unlock the full potential of your hardware, providing you with minimal input lag and the smooth visuals that define true high refresh rate gaming.


