


How to optimize Windows 11 settings for maximum gaming FPS and responsiveness?
Windows 11 is a powerful operating system, but out-of-the-box settings aren’t always optimized for the demanding needs of modern PC gaming. To achieve the highest possible FPS (Frames Per Second) and ensure a butter-smooth, responsive gaming experience, a few strategic tweaks are in order. This guide will walk you through the essential settings to modify, turning your Windows 11 machine into a gaming powerhouse.
Optimize Power Settings for Performance
The default “Balanced” power plan prioritizes energy efficiency, which can throttle your CPU and GPU during intensive gaming sessions. Switching to a “High Performance” or “Ultimate Performance” plan is crucial.
- Go to Settings > System > Power & Battery.
- Under “Power mode,” select Best performance.
- For more advanced options, search for “Edit power plan” in the Start menu, then click Change advanced power settings. Here, ensure “Processor power management” is set to 100% for both minimum and maximum processor state when plugged in.

Fine-Tune Graphics and Game Mode
Windows 11 offers specific features designed to enhance gaming performance.
Enable Game Mode
Game Mode helps prioritize your gaming experience by limiting background activities and dedicating more resources to your game.
- Go to Settings > Gaming > Game Mode.
- Toggle Game Mode to On.
Hardware-Accelerated GPU Scheduling (HAGS)
HAGS can reduce latency and improve performance by allowing your GPU to manage its own video memory more efficiently. This feature requires a compatible GPU (NVIDIA GTX 10-series or newer, AMD Radeon RX 5000-series or newer) and updated drivers.
- Go to Settings > System > Display > Graphics.
- Click on Change default graphics settings.
- Toggle Hardware-accelerated GPU scheduling to On.
- Restart your PC for changes to take effect.
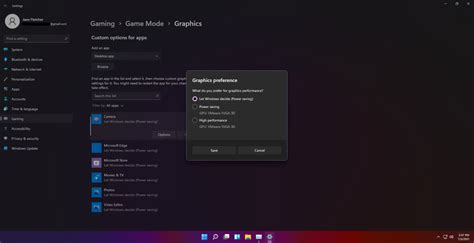
Per-App Graphics Performance Preference
For specific games, you can manually assign a “High performance” graphics preference to ensure they utilize your dedicated GPU.
- In Settings > System > Display > Graphics, click Browse to add your game’s executable (.exe) file.
- Once added, click Options and select High performance.

Minimize Background Processes and Notifications
Unnecessary background applications and intrusive notifications can consume valuable CPU and RAM, impacting gaming performance.
Disable Background Apps
Many apps run in the background, consuming resources. Review and disable those you don’t need constantly running.
- Go to Settings > Apps > Apps & features.
- For each app, click the three dots, then Advanced options, and set “Let this app run in background” to Never for non-essential apps.
Manage Startup Programs
Too many programs launching at startup can slow down your system boot and consume resources from the get-go.
- Open Task Manager (Ctrl+Shift+Esc).
- Go to the Startup apps tab.
- Disable any non-essential programs you don’t need to run immediately when you boot up.
Turn Off Notifications and Focus Assist
Notifications can be disruptive and cause momentary dips in performance.
- Go to Settings > System > Notifications and toggle them off entirely, or customize them for specific apps.
- Utilize Focus Assist (found in Quick Settings or Settings > System > Focus) to silence notifications automatically when gaming.

Update Drivers Regularly
Outdated drivers, especially for your graphics card, chipset, and network adapter, are a common cause of poor gaming performance, instability, and even lower FPS.
- Graphics Card Drivers: Always download the latest drivers directly from NVIDIA, AMD, or Intel’s official websites. Perform a clean installation if possible.
- Chipset Drivers: Visit your motherboard manufacturer’s website to download the latest chipset drivers for your specific model.
- Network Drivers: Ensure your Ethernet or Wi-Fi adapter drivers are up to date for stable online gaming.

Optimize Storage and System Visuals
A clutter-free and efficiently running storage drive, combined with simplified visual effects, contributes to a more responsive system.
Disk Cleanup and Defragmentation
Regularly clean up temporary files and unnecessary system clutter.
- Search for “Disk Cleanup” in the Start menu and run it, selecting your main drive (usually C:).
- For traditional HDDs, defragmentation can improve file access speed. Search for “Defragment and Optimize Drives” and run it. (Note: SSDs do not need defragmentation; Windows handles TRIM automatically, which is their equivalent optimization.)
Adjust Visual Effects for Performance
Windows 11’s visual bells and whistles can consume resources. Dialing them back can free up CPU/GPU cycles.
- Search for “Adjust the appearance and performance of Windows” in the Start menu.
- In the “Performance Options” window, select Adjust for best performance or customize by unchecking effects you don’t need (e.g., animations, shadows).

Conclusion
By systematically applying these Windows 11 optimization tips, you can significantly enhance your gaming FPS and overall system responsiveness. Remember that driver updates, clean storage, and minimal background processes are ongoing maintenance tasks. Regularly revisit these settings to ensure your PC remains a finely tuned gaming machine, ready to deliver the best possible experience in all your favorite titles.


