


How to optimize Windows 11 power settings for maximum gaming performance & lower input lag?

When it comes to gaming on Windows 11, every millisecond and every frame counts. While many gamers focus on graphics cards and CPUs, a often-overlooked area for significant performance gains and reduced input lag lies within your PC’s power settings. Properly configured power options can ensure your system components, especially your processor and GPU, operate at their peak clock speeds without throttling, leading to a smoother, more responsive gaming experience. This guide will walk you through optimizing these crucial settings.
Understanding Windows 11 Power Plans
Windows 11 offers various power plans designed for different usage scenarios. By default, most systems are set to ‘Balanced,’ which aims to save energy by throttling components when not under heavy load. For gaming, this can be detrimental. We’re primarily interested in:
- Balanced: Default, suitable for general use, dynamically adjusts performance.
- High Performance: Prioritizes performance over energy efficiency, keeping components at higher clock speeds.
- Ultimate Performance: An even more aggressive plan (often hidden) that eliminates micro-latencies associated with power management. Ideal for high-end gaming desktops.
Accessing Power Options in Windows 11
Before making any changes, you need to navigate to the power options menu:
- Press
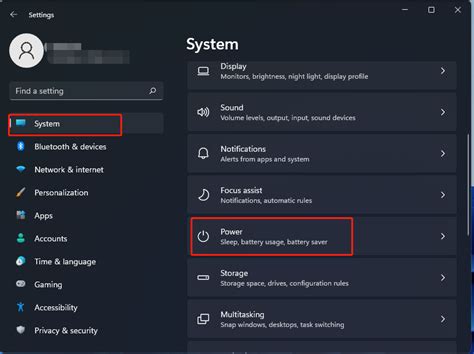
Win + Ito open the Settings app. - Go to System > Power & battery.
- Under ‘Power mode’, you might see options like ‘Balanced’ or ‘Best performance’. For more detailed settings, scroll down and click on ‘Additional power settings’. This will open the classic Control Panel ‘Power Options’ window.
Creating or Customizing a High-Performance Plan
It’s often best to create a new custom plan or modify ‘High Performance’ to ensure your system doesn’t revert to energy-saving settings.
- In the ‘Power Options’ window, select ‘Show additional plans’ if ‘High Performance’ isn’t visible.
- Select ‘High Performance’.
- Click ‘Change plan settings’ next to the High Performance plan.
- On the next screen, click ‘Change advanced power settings’. This is where the critical optimizations happen.
Key Power Settings for Gaming Optimization
Within the ‘Advanced Power Settings’ dialog box, expand each category and adjust as follows:
- Hard disk > Turn off hard disk after: Set to ‘Never’ (0 minutes) for both ‘On battery’ and ‘Plugged in’. This prevents your drive from spinning down during intense gameplay.
- Internet Explorer > JavaScript Timer Frequency: Set to ‘Maximum Performance’. While named for IE, this affects overall system timer resolution.
- Wireless Adapter Settings > Power Saving Mode: Set to ‘Maximum Performance’ for both ‘On battery’ and ‘Plugged in’. Crucial for stable online gaming.
- PCI Express > Link State Power Management: Set to ‘Off’ for both ‘On battery’ and ‘Plugged in’. This prevents your PCIe lanes (where your GPU is connected) from entering low-power states, reducing potential latency.
- USB selective suspend setting: Set to ‘Disabled’ for both ‘On battery’ and ‘Plugged in’. This ensures your gaming peripherals (mouse, keyboard) don’t power down or experience input lag.
- Processor power management: This is one of the most vital sections.
- Minimum processor state: Set to ‘100%’ for both ‘On battery’ and ‘Plugged in’. This forces your CPU to always run at its minimum full speed, preventing it from downclocking.
- System cooling policy: Set to ‘Active’ for both ‘On battery’ and ‘Plugged in’. This tells the system to increase fan speeds to maintain optimal performance before throttling the CPU.
- Maximum processor state: Set to ‘100%’ for both ‘On battery’ and ‘Plugged in’. Ensures your CPU always uses its full available power.
Enabling the Ultimate Performance Power Plan (Desktops Only)
For desktop users, Windows 11 has a hidden ‘Ultimate Performance’ power plan that offers the most aggressive optimizations. It can be enabled via Command Prompt or PowerShell:
- Open Command Prompt or PowerShell as an administrator.
- Type or paste the following command and press Enter:
powercfg -duplicatescheme e9a42b02-d5df-448d-aa00-03f65b888894 - You should see a message indicating the power scheme GUID has been imported.
- Return to the ‘Power Options’ window in the Control Panel, and you will now find ‘Ultimate Performance’ listed. Select it.

Additional Tips for Maximizing Gaming Performance
Beyond power settings, consider these complementary optimizations for an even better gaming experience:
- Update Graphics Drivers: Always keep your GPU drivers updated to the latest version for performance improvements and bug fixes.
- Enable Game Mode: Windows 11’s Game Mode optimizes your PC for gaming by prioritizing game processes and suspending background tasks. Go to Settings > Gaming > Game Mode.
- Disable Background Apps: Close unnecessary applications running in the background to free up system resources.
- Optimize Visual Effects: For older systems, you might gain a few frames by reducing visual effects in Windows. Right-click ‘This PC’ > Properties > Advanced system settings > Performance Settings > ‘Adjust for best performance’.
- Maintain Good Cooling: Ensure your system has adequate cooling, as overheating can cause components to throttle, negating power setting optimizations.

Conclusion
Optimizing your Windows 11 power settings is a critical, yet often overlooked, step in achieving maximum gaming performance and reducing input lag. By ensuring your CPU, GPU, and other components consistently operate at their highest potential, you’ll experience smoother frame rates, faster response times, and a more immersive gaming experience. Take the time to apply these settings, and you’ll notice a tangible difference in your gameplay.


