


Why are my games stuttering? How to optimize Windows 11 for max gaming FPS?

Understanding Game Stuttering on Windows 11
There’s nothing more frustrating for a PC gamer than experiencing game stuttering, especially when you’ve invested in a powerful rig. Stuttering, characterized by irregular pauses or hitches in gameplay, can break immersion and significantly impact your performance. While Windows 11 is a capable operating system, several factors can contribute to these issues, from hardware limitations to software conflicts and unoptimized settings.
Before diving into solutions, it’s crucial to identify the root cause. Common culprits include outdated drivers, insufficient hardware resources (CPU, GPU, RAM), background applications consuming system resources, overheating, and unoptimized Windows settings. This guide will walk you through a comprehensive set of steps to diagnose and resolve stuttering, ensuring your Windows 11 machine delivers maximum gaming FPS.
Essential Driver and Software Updates
1. Update Graphics Drivers
Your graphics card drivers are paramount for gaming performance. Outdated or corrupt drivers are a frequent cause of stuttering. Always ensure you have the latest drivers from your GPU manufacturer (NVIDIA, AMD, or Intel). Use their official software (GeForce Experience, AMD Adrenalin Software) or visit their websites directly for the most recent versions. Perform a clean installation if possible.
2. Update Chipset and Other Drivers
Don’t overlook chipset, audio, and network drivers. Visit your motherboard manufacturer’s website to download the latest drivers for your specific model. Keeping these up-to-date ensures all your system components communicate efficiently, preventing potential bottlenecks that can lead to stuttering.
3. Update Windows 11
Ensure your Windows 11 installation is fully updated. Microsoft frequently releases performance improvements and bug fixes that can positively impact gaming. Go to Settings > Windows Update and check for any pending updates.
Optimize Windows 11 Power and Performance Settings
1. Adjust Power Plan to High Performance/Ultimate Performance
Windows 11 default power plans often prioritize energy efficiency over raw performance. To maximize FPS, switch to a high-performance profile:
- Go to Control Panel > Hardware and Sound > Power Options.
- Select ‘High Performance’ or ‘Ultimate Performance’ (the latter might be hidden; you may need to enable it via Command Prompt:
powercfg -duplicatescheme e9a42b02-d5df-448d-aa00-03f1474967afand then refresh Power Options).
2. Enable Game Mode
Windows 11’s Game Mode is designed to optimize your PC for gaming by prioritizing game processes and suspending background tasks. Make sure it’s enabled:
- Go to Settings > Gaming > Game Mode.
- Toggle ‘Game Mode’ to On.
3. Graphics Settings: Hardware-Accelerated GPU Scheduling
This feature can potentially reduce input lag and improve performance on supported hardware. While results vary, it’s worth testing:
- Go to Settings > System > Display > Graphics.
- Click ‘Change default graphics settings’.
- Toggle ‘Hardware-accelerated GPU scheduling’ to On.
- Also, enable ‘Variable refresh rate’ if your monitor and GPU support it.
4. Specific Game Graphics Performance
In the same Graphics settings, you can add specific games and set their performance preference:
- Click ‘Browse’ and add the executable file of your game.
- Select the game, click ‘Options’, and choose ‘High performance’.
Manage Background Processes and Visual Effects
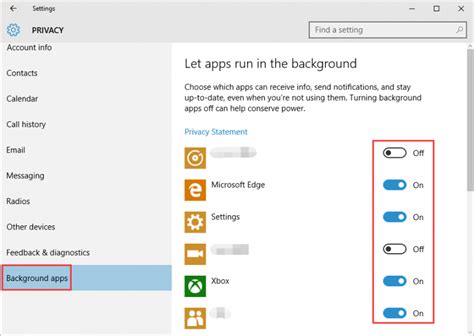
1. Disable Unnecessary Background Apps
Many apps run in the background, consuming CPU, RAM, and even network resources. Close or disable those you don’t need while gaming:
- Go to Settings > Apps > Apps & features.
- For UWP apps, click the three dots, select ‘Advanced options’, and set ‘Background apps permissions’ to ‘Never’.
- For traditional desktop apps, use Task Manager (Ctrl+Shift+Esc) to end tasks or prevent them from starting with Windows.
2. Manage Startup Programs
Minimize the number of programs that launch with Windows:
- Open Task Manager (Ctrl+Shift+Esc).
- Go to the ‘Startup’ tab.
- Disable any non-essential programs by right-clicking and selecting ‘Disable’.
3. Adjust Visual Effects for Performance
Windows 11’s visual flair can consume resources. Reduce them for better gaming performance:
- Search for ‘Adjust the appearance and performance of Windows’ and open it.
- In the ‘Visual Effects’ tab, select ‘Adjust for best performance’ or customize to disable specific effects like ‘Animate windows when minimizing and maximizing’ and ‘Fade or slide menus into view’.
4. Disable Notifications and Focus Assist
Notifications can interrupt gameplay and consume minor resources. Use Focus Assist (previously Quiet Hours) to silence them:
- Go to Settings > System > Focus assist.
- Set it to ‘On’ during gaming hours or when launching a game.
Storage and Hardware Optimization
1. Optimize Your Drives
If you’re using an SSD (Solid State Drive), ensure it’s trimmed regularly (Windows does this automatically, but you can check). If you have an HDD (Hard Disk Drive), defragment it occasionally. Avoid installing games on HDDs if possible; SSDs offer significantly faster loading times and can reduce stuttering related to asset streaming.
- Search for ‘Defragment and Optimize Drives’ and run the tool.
2. Monitor Temperatures and Prevent Overheating
Overheating can lead to thermal throttling, where your CPU or GPU reduces its clock speed to prevent damage, causing severe stuttering. Ensure your PC has adequate cooling:
- Clean dust from fans and heatsinks regularly.
- Ensure proper case airflow (intake and exhaust fans).
- Consider using monitoring software (e.g., HWMonitor, MSI Afterburner) to keep an eye on CPU/GPU temperatures.

Advanced Troubleshooting and Considerations
1. Check for Malware
Malware can consume significant system resources and cause performance issues. Run a full scan with Windows Security or a reputable antivirus program.
2. Disable Superfetch/SysMain (Proceed with Caution)
While generally beneficial, some users report that disabling Superfetch (now called SysMain) can help with stuttering, especially on systems with limited RAM or older HDDs. You can disable it via Services (search ‘services.msc’). Toggle ‘Startup type’ to ‘Disabled’ for ‘SysMain’. Re-enable if it causes issues.
3. Update BIOS/UEFI
A BIOS/UEFI update can sometimes bring performance improvements or better hardware compatibility. Only do this if you’re comfortable, as an incorrect update can damage your motherboard.
4. Consider a Fresh Windows Installation
If all else fails, a clean installation of Windows 11 can resolve deep-seated software conflicts and accumulated junk that might be impacting performance.

Conclusion
Eliminating game stuttering and maximizing FPS on Windows 11 often requires a multi-faceted approach. By systematically updating drivers, optimizing power and graphics settings, managing background processes, and ensuring proper hardware health, you can significantly improve your gaming experience. Remember to test changes one by one to identify which optimizations have the most impact on your specific system. Happy gaming!


