How to fix broken mods & game updates, maintaining a stable mod load order?
The Ever-Present Challenge: Mods, Updates, and Stability
For many PC gamers, mods are the lifeblood of replayability, enhancing graphics, adding new content, and refining gameplay in countless ways. However, the joy of modding often comes with the frustration of instability, especially after a game receives an official update. A perfectly stable modded setup can crumble overnight, leading to crashes, broken features, or even an unplayable game. This guide will walk you through the essential steps to identify, diagnose, and fix common mod-related issues, helping you maintain a stable and enjoyable modded experience.

Understanding the Root Causes of Mod Breakage
Before diving into fixes, it’s crucial to understand why mods break in the first place. Knowing the source of the problem often leads directly to the solution.
- Game Updates: This is arguably the most common culprit. Game developers frequently update their titles, changing game engine code, file structures, or APIs (Application Programming Interfaces). Mods that directly interact with these changed elements will often become incompatible, leading to crashes or incorrect behavior.
- Mod Conflicts: When two or more mods try to modify the same game asset, script, or record in different ways, a conflict arises. The game doesn’t know which mod’s changes to prioritize, resulting in unexpected behavior, visual glitches, or crashes.
- Incorrect Load Order: The order in which mods are loaded by the game is paramount. Some mods rely on others (dependencies) or need to override specific files from other mods. An incorrect load order can lead to missing textures, broken quests, or overall instability.
- Outdated Mods or Tools: Mods that haven’t been updated for a long time might contain bugs or be incompatible with newer game versions or even newer operating systems. Similarly, outdated modding tools can cause issues during installation or management.
- User Error: Sometimes, the problem lies in incorrect installation, missing requirements, or simply installing too many conflicting mods without proper research.
Pre-Emptive Measures & Best Practices
A little preparation goes a long way in preventing headaches and making troubleshooting easier.
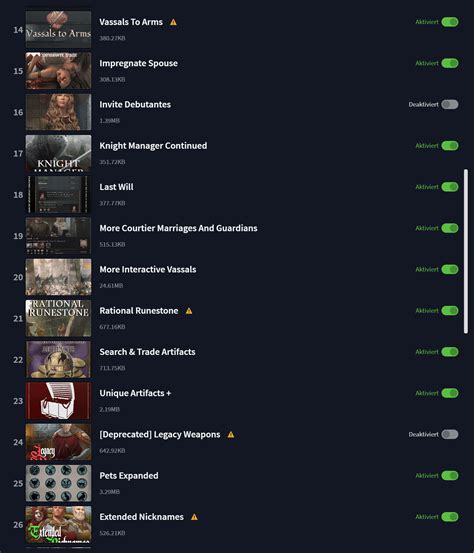
- Use a Robust Mod Manager: Tools like Mod Organizer 2 (MO2) or Vortex are indispensable. They create virtual file systems, allowing you to install, enable, disable, and uninstall mods without touching your game’s core files, making troubleshooting much safer.
- Back Up Your Game: Before any major modding session or a new game update, back up your entire game directory and your mod manager’s profile data. This provides a clean slate to revert to if things go wrong.
- Read Mod Descriptions Carefully: Always check a mod’s requirements, incompatibilities, and installation instructions. Don’t skip this step!
- Start Small, Add Gradually: Don’t install dozens of mods at once. Add a few at a time, test extensively, and then add more. This helps you pinpoint which mod caused a problem.
- Keep Up-to-Date (Selectively): Monitor your essential mods for updates, especially after a game update. However, don’t update mods blindly; sometimes an older, stable version is preferable if the new one introduces issues.
Troubleshooting Broken Mods & Updates
1. Isolate the Problem
This is the most critical step. You need to identify which mod or interaction is causing the issue.
- Disable All Mods: The first step is always to disable all your mods and launch the game. If the game runs fine, you know the problem is definitely mod-related.
- Enable in Batches: If using a mod manager, enable mods in small groups (e.g., 5-10 at a time), testing the game after each batch until the issue reappears. This helps narrow down the problematic mod or group of mods.
- Check Recent Changes: Think about what you changed last. Did you install a new mod? Update an existing one? Revert to the state before that change.
2. Check for Mod Updates & Compatibility Patches
Once you’ve identified a potentially problematic mod (or after a game update), visit its page on the Nexus, ModDB, or other platforms. Look for:
- Update Announcements: Has the mod author released an update addressing compatibility with the latest game patch?
- Bug Reports & Comments: Check if other users are reporting similar issues and if there are known fixes or workarounds.
- Compatibility Patches: Many popular mods have dedicated compatibility patches to make them work with other large mods. Ensure you have all necessary patches installed and enabled.
3. Verify Game Files Integrity
Sometimes, game updates or mod installations can corrupt core game files. Most game launchers (Steam, GOG Galaxy, Epic Games Store) offer a “verify integrity of game files” option. Use this to restore any corrupted or missing original files.
4. Rebuild & Clean Mod Installations
If a mod is causing issues, try a clean reinstallation:
- Uninstall & Delete: Completely uninstall the problematic mod via your mod manager and ensure no lingering files remain.
- Re-download & Reinstall: Download a fresh copy of the mod (ensuring it’s the correct version for your game) and reinstall it.
- Clean Save: If the issue involves script-heavy mods, starting a new game (or reverting to a save made before the mod was installed) might be necessary, as mod scripts can be baked into save files.
5. Optimize Your Load Order
An optimized load order is crucial for stability, especially in games like Skyrim or Fallout. Tools like LOOT (Load Order Optimisation Tool) are essential. LOOT automatically sorts your plugins, identifies conflicts, and suggests cleaning for dirty plugins.
- Run LOOT Regularly: After installing new mods or after a game update, run LOOT. It will sort your plugins according to established rules and identify potential issues.
- Manual Adjustments: While LOOT is excellent, sometimes minor manual adjustments are needed based on specific mod interactions or personal preferences. Consult mod pages for recommended load order rules.
Advanced Load Order Management & Conflict Resolution
For persistent issues, you might need to dive deeper into your mod setup.
- Understanding Plugin Types: Learn about ESL, ESP, and ESM files. ESL-flagged ESPs are lightweight and don’t count towards the plugin limit, while ESMs are master files that other plugins rely on.
- Using xEdit (SSEEdit/FO4Edit): Tools like xEdit allow you to see exactly what changes each mod makes and identify precise conflicts. You can create custom patches (merged patches or conflict resolution patches) to resolve these conflicts manually, ensuring your desired changes take precedence.
- Merged Patches: A merged patch (often created with xEdit) combines conflicting records from multiple mods into a single new plugin, resolving conflicts and reducing plugin count.
- Bashed Patches (Wrye Bash): For games like Oblivion, Skyrim LE, and Fallout 3/NV, Wrye Bash’s Bashed Patch is invaluable. It merges leveled lists, makes minor adjustments, and resolves simple conflicts automatically.

Conclusion
Maintaining a stable mod load order, especially in the face of game updates, requires patience, attention to detail, and a willingness to learn. By adopting best practices, using robust modding tools, and systematically troubleshooting issues, you can minimize downtime and maximize your enjoyment of modded games. Remember to always back up your files, read mod descriptions, and embrace the powerful community tools available to you. Happy modding!