Best practices for managing game mod conflicts & ensuring stability?

Modding can vastly enhance a game’s lifespan and enjoyment, offering new content, improved graphics, and unique gameplay mechanics. However, integrating multiple mods often leads to conflicts that can cause crashes, glitches, or even render your game unplayable. Adopting best practices is essential for a stable and fulfilling modded experience.
Understanding Mod Conflicts
Before diving into solutions, it’s vital to understand why conflicts occur. Mods often modify the same game files, scripts, or assets, leading to overwrites or incompatible behaviors. Common conflict types include:
- File Overwrites: When two mods try to change the same texture, mesh, or data file. The mod loaded last typically ‘wins’, but this can break functionality if the earlier mod was a prerequisite.
- Script Conflicts: When mods alter the same game scripts, leading to unexpected behavior, infinite loops, or crashes.
- Load Order Issues: The sequence in which mods are loaded dictates which changes take precedence. Incorrect load order is a frequent cause of instability.
- Incompatibilities: Sometimes, mods are fundamentally designed in a way that makes them incompatible, regardless of load order.

Essential Pre-Installation Steps
Preparation is key to preventing future headaches:
- Read Mod Descriptions Thoroughly: Always read the full mod page. Look for compatibility notes, required dependencies (master files), and installation instructions. Many conflicts can be avoided by simply following the author’s advice.
- Check for Prerequisites and Patches: Ensure you have all necessary frameworks, other mods, or official patches a mod might require. Many mod authors also provide compatibility patches for popular mods.
- Backup Your Game and Saves: Before beginning any significant modding, create a clean backup of your game installation and your save files. This allows for easy recovery if things go wrong.
- Install Mods Incrementally: Avoid installing dozens of mods at once. Add a few at a time, test the game thoroughly, and then add more. This helps isolate problematic mods.
Leveraging Mod Managers
Manual mod installation is a relic of the past for complex games. Modern mod managers are indispensable tools:
- Mod Organizer 2 (MO2): Offers a ‘virtual’ file system, meaning mods are installed into separate directories and ‘linked’ into the game without altering the base game folder. This makes installation, uninstallation, and conflict resolution incredibly clean. It also allows for multiple profiles.
- Vortex: Nexus Mods’ official manager, designed to be user-friendly. It handles installations, deploys files, and provides conflict detection and resolution suggestions.
These tools often include built-in load order sorting, conflict detection, and easy mod toggling, making them invaluable for maintaining stability.

Mastering Load Order
Load order determines which mod’s changes take precedence. A proper load order is critical:
- Automated Load Order Tools: Tools like LOOT (Load Order Optimisation Tool) for Bethesda games (Skyrim, Fallout) analyze your installed mods and automatically sort them into an optimized load order. Always run LOOT after installing new mods.
- Manual Adjustments: While LOOT is excellent, sometimes manual adjustments are necessary based on specific mod instructions or to resolve unique conflicts. Understand the general principles: master files first, then large overhauls, followed by smaller additions, and finally patches.
Conflict Resolution Techniques
Even with good load order, some conflicts require direct intervention:
- Compatibility Patches: The easiest solution is to use a patch provided by mod authors, designed specifically to make two or more mods work together.
- Merged Patches / Bashed Patches: Tools like Wrye Bash (for Bethesda games) can create a “Bashed Patch” that merges leveled lists, recipes, and other data from multiple mods into a single file, reducing conflicts and esp/esm count.
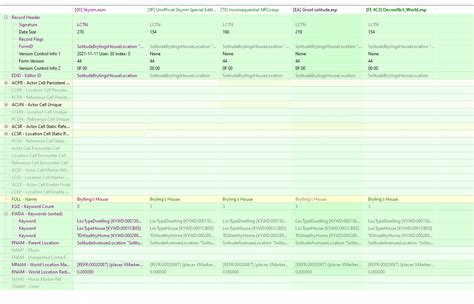
- Manual Conflict Editing (xEdit/FO4Edit/SSEEdit): For advanced users, tools like xEdit allow you to directly view and resolve conflicts between specific records in your mods. You can choose which mod’s changes to keep or create new merged records. This is powerful but requires caution and understanding.
Troubleshooting and Testing
When issues arise, a systematic approach is best:
- Identify the Problem: Note down exactly what happens (crash to desktop, specific bug, visual glitch) and when it occurs.
- Revert and Test: If you installed multiple mods, disable the most recent ones and test again. This pinpoints the culprit.
- Binary Search Method: If you have many mods and don’t know the cause, disable half your mods. If the problem persists, the issue is in the remaining half. If it disappears, it’s in the disabled half. Repeat this process, halving the problematic set each time until you find the conflicting mod.
- Check Community Resources: Forums, wikis, and mod pages often contain solutions for common conflicts with popular mods.
- Monitor Performance: Keep an eye on your game’s performance. Sudden drops or stuttering can indicate a mod conflict or resource hog.
Managing mod conflicts can seem daunting, but by following these best practices – using mod managers, understanding load order, employing conflict resolution tools, and systematic troubleshooting – you can ensure a stable, enriched, and thoroughly enjoyable modded gaming experience. Patience and diligence are your greatest assets in the world of modding.