Best tips for resolving game mod conflicts & keeping your mod list stable?

Navigating the Wild World of Game Modding
Game modding offers an unparalleled opportunity to personalize your gaming experience, from subtle graphical enhancements to complete gameplay overhauls. However, this freedom often comes with a significant challenge: mod conflicts. As you add more modifications, the likelihood of them clashing increases, leading to crashes, bugs, or unexpected behavior. Keeping your mod list stable requires a methodical approach, a bit of technical understanding, and patience. This guide will walk you through the best practices for identifying, resolving, and preventing mod conflicts, ensuring your custom game setup runs as smoothly as possible.

Understanding the Roots of Mod Conflicts
Mod conflicts arise when two or more mods try to alter the same game files, records, or scripts in incompatible ways. Understanding the common causes is the first step towards resolving them:
- File Overwrites: The most basic conflict occurs when one mod replaces files (like textures, meshes, or sound files) that another mod also uses. Whichever mod is loaded last will “win” the conflict for that specific file.
- Record Conflicts: Many games use databases (like Bethesda’s ESL, ESP, ESM files) that contain records defining game elements (items, NPCs, quests, world spaces). If multiple mods modify the same record without proper patching, the outcome can be unpredictable, often resulting in “dirty edits” or unintended behavior.
- Script Mismatches: Complex mods often introduce new scripts or modify existing ones. Conflicts can occur if scripts from different mods interact poorly or try to execute conflicting instructions at the same time.
- Load Order Issues: The order in which your game loads mods is crucial. A poorly optimized load order can cause mods to overwrite essential data from other mods, leading to errors even if the mods themselves aren’t inherently incompatible.
Essential Tools and Best Practices for Mod Management
Before diving into conflict resolution, equip yourself with the right tools and adopt smart habits:
1. Use a Reputable Mod Manager: Programs like Vortex or Mod Organizer 2 (MO2) are indispensable. They handle installation, file virtualization (preventing direct modification of your game directory), load order management, and even some conflict detection. MO2, in particular, excels at providing granular control over file priority.
2. Read Mod Descriptions Carefully: This cannot be stressed enough. Mod authors often include vital information about compatibility, required patches, load order suggestions, and known conflicts. Ignoring this information is a fast track to instability.

3. Install Mods Incrementally: Don’t dump dozens of mods into your game at once. Install one or a small group of related mods, test thoroughly, and only then proceed with the next batch. This makes isolating problematic mods much easier.
4. Understand Load Order Optimization Tools: For many games, especially Bethesda titles, LOOT (Load Order Optimization Tool) is a must-have. It automatically sorts your plugins (ESMs, ESPs, ESLs) into an optimized load order based on a comprehensive masterlist, significantly reducing conflicts.
5. Familiarize Yourself with Conflict Detection Tools: Tools like xEdit (TES5Edit, SSEEdit, FO4Edit for Elder Scrolls/Fallout games) allow you to examine individual records within your plugins, identify specific conflicts, and even create custom patches to resolve them. This is an advanced but incredibly powerful skill.
Resolving and Patching Mod Conflicts
Once you’ve identified a conflict, here’s how to tackle it:
Optimizing Your Load Order with LOOT
Run LOOT regularly. After installing new mods, run LOOT to sort your plugins. Pay attention to any warnings or error messages it provides, as these often point to missing masters or critical compatibility issues.
Creating Compatibility Patches with xEdit
For deeper conflicts, especially record-level ones, xEdit is your friend:
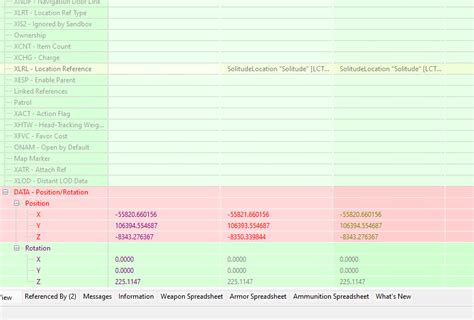
- Identify Conflicts: Load all your plugins in xEdit. Conflicts will often be highlighted in different colors (e.g., red for critical conflicts, yellow for overridden records).
- Apply Forwarding: For simple overwrites, you might just need to “forward” a record from one mod to another. For example, if Mod A changes an NPC’s hair and Mod B changes their clothes, you can create a patch that includes Mod A’s hair change and Mod B’s clothes change on that NPC.
- Merge Patches/Bashed Patches: Tools like Wrye Bash (for Bethesda games) or manual merging in xEdit can combine changes from multiple mods into a single patch. This reduces plugin count and resolves many low-level conflicts automatically.
- Clean “Dirty” Plugins: Some mods might unintentionally carry over “dirty edits” from the base game or other mods. xEdit can help you identify and clean these records, improving stability.
Leveraging Community-Made Patches
Before creating your own patch, check the mod pages or Nexus Mods’ “Files” tab for existing compatibility patches. Many popular mod combinations already have community-made fixes.

Maintaining a Stable Mod List
Conflict resolution isn’t a one-time task; it’s an ongoing process. Here’s how to keep your mod setup robust:
1. Backup Your Game and Mod Profiles: Before making significant changes, always back up your game directory (or at least your mod manager’s profile data). This allows you to revert to a working state if things go awry.
2. Test Frequently and Methodically: After installing a new mod or group of mods, don’t just load your latest save. Start a new game (if applicable), visit areas affected by the mods, and actively test their functionality. This helps catch issues early.
3. Don’t Update Blindly: While keeping mods updated is generally good, sometimes new versions can introduce regressions or new conflicts. Read changelogs carefully and consider waiting a few days after an update to see if other users report issues.
4. Engage with the Modding Community: Forums, Discord servers, and mod comment sections are invaluable resources. If you’re stuck, chances are someone else has encountered and solved a similar problem.

Conclusion
Resolving game mod conflicts and maintaining a stable mod list can seem daunting, but by adopting a systematic approach – utilizing robust mod managers, carefully reading documentation, optimizing your load order, and learning basic patching techniques – you can significantly reduce headaches. Patience, persistence, and a willingness to learn are your best allies in crafting the perfect, personalized gaming experience. Happy modding!