


Boost FPS: What are the top 3 Windows settings to tweak for gaming performance?
Are you experiencing frustrating frame drops or simply want to squeeze every last frame per second (FPS) out of your gaming rig? While hardware upgrades are often the go-to solution, there’s a lot you can do with your current setup by simply optimizing your Windows operating system. Many default Windows settings aren’t configured for peak gaming performance, but a few quick tweaks can make a noticeable difference.
In this article, we’ll dive into the three most impactful Windows settings you can adjust right now to boost your FPS and enjoy a smoother, more responsive gaming experience.
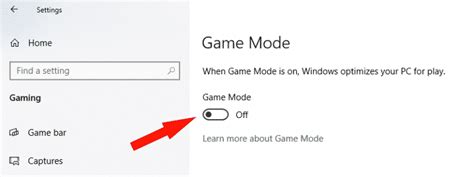
1. Activate Game Mode
Windows Game Mode is designed to optimize your PC for gaming by prioritizing game resources, preventing Windows Update from installing drivers or sending restart notifications, and ensuring your system dedicates its power to the game you’re playing. It’s a simple yet effective setting that often gets overlooked.
How to Enable Game Mode:
- Press the
Windows key + Ito open Settings. - Click on Gaming.
- Select Game Mode from the left-hand menu.
- Ensure the toggle switch for Game Mode is set to On.
2. Optimize Graphics Settings (Hardware-accelerated GPU Scheduling & Per-App)
Modern versions of Windows offer advanced graphics settings that can dramatically improve how your GPU manages workloads, leading to better performance and reduced latency. This involves two key components: Hardware-accelerated GPU scheduling and setting specific applications to ‘High performance’.
How to Optimize Graphics Settings:
- Press the
Windows key + Ito open Settings. - Go to System, then select Display.
- Scroll down and click on Graphics settings.
-
Enable Hardware-accelerated GPU scheduling: If your graphics card supports it (NVIDIA GTX 10-series or newer, AMD Radeon RX 5000-series or newer, and compatible drivers), toggle this option to On. This can reduce input lag and improve performance.
Note: A system restart is usually required after enabling this setting.
-
Set specific games/apps to High performance: Under the ‘Add an app’ section, select ‘Desktop app’. Click ‘Browse’ and navigate to the executable file (.exe) of your game. Once added, click on the game, select ‘Options’, and choose ‘High performance’. This ensures your system uses your dedicated GPU for that specific game.

3. Set Your Power Plan to High Performance
Your Windows power plan dictates how your CPU and GPU manage their power consumption. By default, many systems are set to ‘Balanced’ to save energy, which can limit your hardware’s potential during demanding tasks like gaming. Switching to ‘High Performance’ ensures your components run at their maximum clock speeds without throttling.
How to Change Your Power Plan:
- Type
power planinto the Windows search bar and select Choose a power plan. - In the Power Options window, expand ‘Show additional plans’ if necessary.
- Select High performance. (Some systems, especially those with custom OEM settings, might also have an ‘Ultimate Performance’ option – choose that if available for maximum power).
- Close the window.
Conclusion
By implementing these three simple Windows settings, you can significantly improve your gaming performance without spending a single dollar on new hardware. Activating Game Mode, optimizing your graphics settings with GPU scheduling and per-app high performance, and switching to a High Performance power plan will help ensure your PC is running at its full potential for a smoother and more enjoyable gaming experience. Give these tweaks a try and feel the FPS difference!


