


How do I enable XMP/DOCP for faster RAM in my gaming rig?

When you purchase high-speed RAM for your gaming rig, you might be surprised to find it’s not running at its advertised speeds right out of the box. This is because RAM modules default to a conservative JEDEC standard speed (often 2133MHz or 2400MHz) to ensure compatibility across a wide range of systems. To unleash the full potential of your faster RAM, you need to enable its pre-configured overclocking profile—known as XMP for Intel platforms or DOCP (Direct Overclock Profile) for AMD platforms. This guide will walk you through the simple steps to activate these profiles and optimize your gaming experience.
Understanding XMP/DOCP and Why It Matters
XMP (Extreme Memory Profile) and DOCP (D.O.C.P., or sometimes A-XMP for MSI, EOCP for GIGABYTE AMD) are essentially pre-defined overclocking profiles stored directly on your RAM modules. These profiles contain specific timing, voltage, and frequency settings that allow the RAM to operate at its advertised, higher speeds. Without enabling XMP/DOCP, your RAM will run at a slower, generic speed, leaving a significant amount of performance on the table for tasks like gaming, video editing, and heavy multitasking.
For gamers, faster RAM directly impacts frame rates, especially in CPU-intensive titles, and improves overall system responsiveness. It’s a fundamental step in optimizing your build that many overlook.
Before You Begin: Key Considerations
Before diving into your BIOS settings, ensure you meet a few prerequisites:
- Compatible Motherboard: Your motherboard must support XMP/DOCP. Most modern motherboards designed for gaming or enthusiasts do, but always check your motherboard’s specifications or manual.
- Compatible RAM: Ensure your RAM modules are rated for speeds higher than the JEDEC default (e.g., 3200MHz, 3600MHz). The XMP/DOCP profile will only work if your RAM supports it.
- BIOS/UEFI Version: While not always necessary, an updated BIOS/UEFI firmware can improve stability and compatibility, especially with newer RAM modules. Check your motherboard manufacturer’s website for updates.
Step-by-Step Guide: Enabling XMP/DOCP
1. Access Your Motherboard’s BIOS/UEFI
Restart your computer. As it boots up, repeatedly press the designated key to enter the BIOS/UEFI. This key varies by motherboard manufacturer but is commonly Del, F2, F10, or F12. Watch for a prompt on your screen during startup, which usually indicates the correct key.

2. Navigate to Memory Settings
Once in the BIOS/UEFI, the interface can vary greatly between manufacturers (ASUS, MSI, Gigabyte, ASRock, etc.). Look for a section related to ‘Overclocking’, ‘Extreme Tweaker’, ‘AI Tweaker’, ‘Advanced DRAM Configuration’, ‘Memory Settings’, or similar. You might need to switch from an ‘Easy Mode’ to an ‘Advanced Mode’ to find these options.
3. Enable the XMP/DOCP Profile
Within the memory settings, you should find an option for ‘XMP Profile’, ‘DOCP’, ‘A-XMP’, ‘EOCP’, or ‘Memory Profile’. It will likely be set to ‘Disabled’ or ‘Auto’ by default. Click on this option and select the available profile. Most high-speed RAM will have one or two profiles. Choose the highest one that matches your RAM’s advertised speed (e.g., ‘Profile 1’ or ‘DDR4-3600MHz’).
The system will automatically apply the correct frequency, timings, and voltage for your RAM based on the selected profile.
![What Does DOCP Mean in BIOS [Comprehensive Guide 2024]](/images/aHR0cHM6Ly90czEubW0uYmluZy5uZXQvdGg/aWQ9T0lQLjZDRDJweEVZRWtjcGlOYnhRWG9sdGdIYURGJnBpZD0xNS4x.webp)
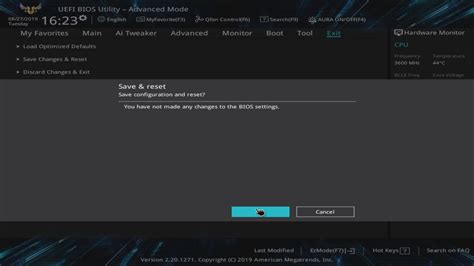
4. Save and Exit
After selecting the profile, locate the ‘Save & Exit’ or ‘Exit’ tab. Choose ‘Save Changes and Exit’ or ‘Save Configuration and Reset’. Your system will then reboot.
Verifying Your Settings
Once your PC has restarted, it’s a good idea to confirm that XMP/DOCP has been successfully enabled:
- Task Manager: Open Task Manager (Ctrl + Shift + Esc), go to the ‘Performance’ tab, and select ‘Memory’. You should see your RAM’s ‘Speed’ now reflects the higher frequency you selected (e.g., 3600 MHz).
- CPU-Z: For a more detailed look, download and install a utility like CPU-Z. In the ‘Memory’ tab, check the ‘DRAM Frequency’. Remember that DDR (Double Data Rate) RAM effectively doubles this number, so 1800MHz in CPU-Z means 3600MHz RAM speed.
Troubleshooting Common Issues
While enabling XMP/DOCP is usually straightforward, you might encounter issues:
- System Instability/Boot Loops: If your system becomes unstable or enters a boot loop after enabling XMP/DOCP, it might indicate that your CPU’s memory controller or motherboard is struggling to handle the higher speeds, or the RAM itself is faulty.
- Clearing CMOS: If your system won’t boot, you may need to clear your motherboard’s CMOS (Complementary Metal-Oxide Semiconductor) to reset the BIOS settings to default. This usually involves removing the CMOS battery for a few minutes or using a dedicated ‘Clear CMOS’ jumper/button on your motherboard.
- Try a Lower Profile: If your RAM has multiple XMP/DOCP profiles and the highest one causes instability, try the next lower profile.
- Manual Settings: In rare cases, you might need to manually input timings and voltage if XMP/DOCP profiles don’t work, but this is an advanced step.
Conclusion
Enabling XMP or DOCP is a simple yet effective way to significantly boost your gaming rig’s performance by ensuring your RAM operates at its intended, faster speeds. By following these steps, you’ll unlock the full potential of your memory, leading to smoother gameplay, faster load times, and an overall more responsive system. Enjoy your optimized gaming experience!


