


How do I install an M.2 NVMe SSD for faster game loading times?
Upgrade Your Gaming Experience with NVMe
Lagging load times can be a gamer’s worst enemy, pulling you out of the immersive world just when the action is about to begin. If you’re still relying on a traditional hard drive or even an older SATA SSD, upgrading to an M.2 NVMe SSD can dramatically slash those loading screens, getting you back into the game faster. This guide will walk you through the process of installing an M.2 NVMe SSD, ensuring your gaming rig performs at its peak.
Before You Begin: Gather Your Tools and Prepare
Before diving into your PC’s internals, ensure you have everything you need. You’ll need your new M.2 NVMe SSD, a Phillips head screwdriver (and potentially a small flathead for some standoffs), your motherboard’s manual (highly recommended for locating M.2 slots), and an anti-static wristband or by regularly touching a grounded metal object to prevent static discharge. It’s also a good idea to back up any critical data, though this installation shouldn’t affect your existing drives if done correctly.

Step 1: Power Down and Open Your PC
Safety first! Completely shut down your computer, unplug the power cable from the wall and the back of your PC, and hold the power button for a few seconds to drain any residual power. Place your PC on a flat, clean, and well-lit surface. Remove the side panel of your computer case, usually by unscrewing a few thumbscrews or standard screws at the back.
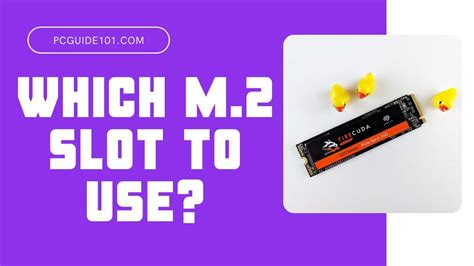
Step 2: Locate the M.2 Slot on Your Motherboard
M.2 slots typically look like small horizontal slots, often labeled “M.2” or “PCIe.” They can be found in various locations, but commonly near the CPU, under the graphics card, or sometimes on the lower half of the motherboard. Consult your motherboard manual for the exact location and type of M.2 slots (some support both SATA and NVMe, while others are NVMe-only). You might also find a small standoff screw already in place for securing the SSD.
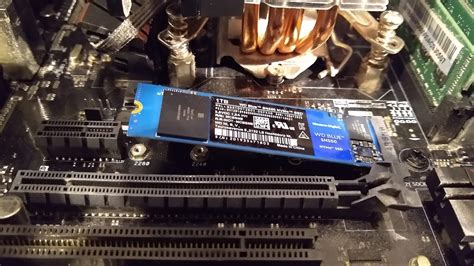
Step 3: Insert the M.2 NVMe SSD
Carefully unbox your M.2 NVMe SSD. Holding it by the edges, align the notched end of the SSD with the M.2 slot. Insert the SSD at about a 30-degree angle, applying gentle, even pressure until it is fully seated. You should feel it click into place or securely slide in.
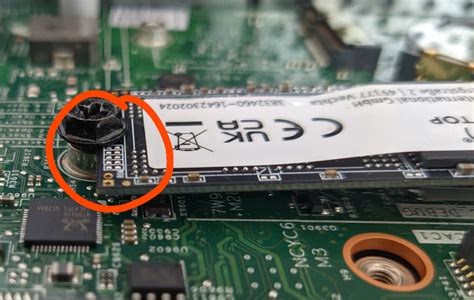
Step 4: Secure the M.2 SSD
Once inserted, the SSD will be angled upwards. Gently push it down until it’s parallel with the motherboard. Secure it using the small screw and standoff that came with your motherboard or the SSD itself. If your motherboard has a pre-installed standoff, you might only need the screw. Some motherboards use a tool-less clip mechanism instead of a screw.
Step 5: Close Your PC and Reconnect Peripherals
With the SSD securely installed, reattach your PC’s side panel. Plug in the power cable, monitor, keyboard, mouse, and any other peripherals. Power on your computer.
Step 6: Initialize and Format the SSD (Software Setup)
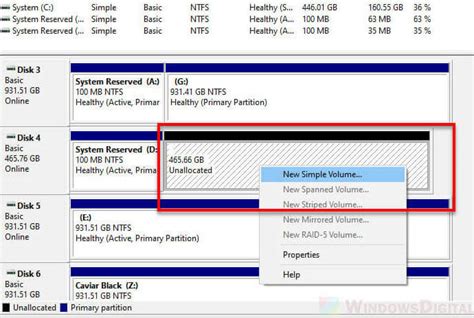
Once your PC boots, the new NVMe SSD won’t immediately appear in File Explorer. You’ll need to initialize and format it.
- Right-click the Start button (or press
Windows Key + X) and select “Disk Management.” - In Disk Management, you should see your new SSD listed as “Disk {number}” and marked as “Not Initialized.” Right-click on it and select “Initialize Disk.”
- Choose “GPT (GUID Partition Table)” as the partition style (recommended for modern systems) and click “OK.”
- Once initialized, the disk will appear as “Unallocated Space.” Right-click on it and select “New Simple Volume.”
- Follow the New Simple Volume Wizard, choosing the maximum size, assigning a drive letter, and selecting “NTFS” as the file system. You can also name your volume (e.g., “Games Drive”). Click “Next” and then “Finish.”
Your new M.2 NVMe SSD is now ready for use!
Step 7: Migrate Games or Install New Ones
To take advantage of your new SSD’s speed, you can either:
- Reinstall Games: The simplest method is to uninstall games from your old drive and reinstall them directly onto the new NVMe SSD via your game launchers (Steam, Epic Games, etc.). Remember to set your NVMe SSD as the default install location in your game launcher settings.
- Migrate Games: Some game launchers (like Steam) allow you to move installed games between drives. Alternatively, third-party software can help migrate entire folders, but be cautious and back up data first.
Troubleshooting Common Issues
If your SSD isn’t showing up in Disk Management:
- Check BIOS/UEFI: Enter your PC’s BIOS/UEFI settings during startup (usually by pressing Del, F2, F10, or F12). Ensure the M.2 slot is enabled and correctly configured. Some motherboards disable SATA ports when an M.2 NVMe drive is installed in certain slots.
- Re-seat the SSD: Power down, unplug, and carefully re-seat the NVMe SSD in its slot to ensure a proper connection.
- Consult Motherboard Manual: Confirm your M.2 slot supports NVMe (not just SATA M.2) and that there are no compatibility conflicts with other installed hardware.
![8 Ways To Fix M.2 SSD Not Showing Up in BIOS [Updated 2024]](/images/aHR0cHM6Ly90czIubW0uYmluZy5uZXQvdGg/aWQ9T0lQLk14SlBXR0lGVVNSNzJWaEtzZEpmT1FBQUFBJnBpZD0xNS4x.webp)
Enjoy Blazing-Fast Load Times!
With your M.2 NVMe SSD successfully installed and configured, you’re all set to experience dramatically faster game loading times, quicker system boot-ups, and an overall snappier computing experience. Dive back into your favorite games without the frustrating waits, and enjoy the seamless performance an NVMe drive provides!


