


How do I properly enable G-Sync/FreeSync on my gaming monitor for tear-free gameplay?
Understanding Adaptive Sync Technologies
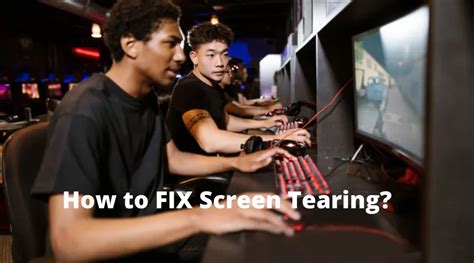
Screen tearing, the annoying visual artifact that breaks immersion during fast-paced gaming, is a common frustration for PC gamers. Fortunately, technologies like NVIDIA’s G-Sync and AMD’s FreeSync (both forms of adaptive sync) were developed to eliminate this issue by synchronizing your monitor’s refresh rate with your graphics card’s frame output. The result is incredibly smooth, tear-free gameplay, even when frame rates fluctuate.
Before diving into the setup, it’s crucial to understand the basic requirements and ensure your system is ready to harness these features.

Prerequisites for Enabling G-Sync/FreeSync
Enabling adaptive sync isn’t just a flick of a switch; it requires compatible hardware and up-to-date software. Here’s a checklist:
- Compatible Monitor: Your monitor must explicitly support G-Sync (native module), G-Sync Compatible (VESA Adaptive Sync), or FreeSync (VESA Adaptive Sync).
- Compatible Graphics Card: NVIDIA GPUs (GTX 10-series or newer, RTX series) for G-Sync/G-Sync Compatible; AMD GPUs (RX series or newer, R9 290/290X or newer) for FreeSync.
- Correct Display Cable: For most adaptive sync implementations, you’ll need a DisplayPort cable. Some FreeSync monitors also support adaptive sync over HDMI (HDMI 2.0 or newer), but DisplayPort is generally recommended for the widest compatibility and highest refresh rates.
- Latest Graphics Drivers: Always ensure your GPU drivers are up-to-date. Download the latest drivers directly from NVIDIA or AMD’s official websites.
Enabling FreeSync (AMD Graphics Cards)
If you have an AMD graphics card and a FreeSync-compatible monitor, follow these steps:
Step 1: Enable FreeSync on Your Monitor
Access your monitor’s On-Screen Display (OSD) menu (usually via buttons on the monitor itself). Navigate to the ‘Gaming,’ ‘Display,’ or ‘Picture’ settings, and find the ‘FreeSync,’ ‘Adaptive Sync,’ or ‘VRR’ (Variable Refresh Rate) option. Ensure it is set to ‘On’ or ‘Enabled.’ Some monitors might have different FreeSync ranges (e.g., ‘Standard Engine’ or ‘Ultimate Engine’); consult your monitor’s manual for optimal settings.
Step 2: Enable FreeSync in AMD Radeon Software
- Right-click on your desktop and select ‘AMD Radeon Software.’
- Go to the ‘Gaming’ tab and then ‘Display.’
- You should see an option for ‘AMD FreeSync.’ Toggle this to ‘Enabled.’
- Ensure ‘Radeon Enhanced Sync’ is off, as it can sometimes conflict with FreeSync.
Enabling G-Sync (NVIDIA Graphics Cards)
For NVIDIA GPU users with G-Sync or G-Sync Compatible monitors:
Step 1: Enable Adaptive Sync on Your Monitor (G-Sync Compatible only)
If you have a ‘G-Sync Compatible’ monitor (which uses VESA Adaptive Sync), you might need to enable ‘Adaptive Sync’ or ‘FreeSync’ in your monitor’s OSD, similar to the AMD steps above. Native G-Sync monitors do not require this step, as G-Sync is always on by default.
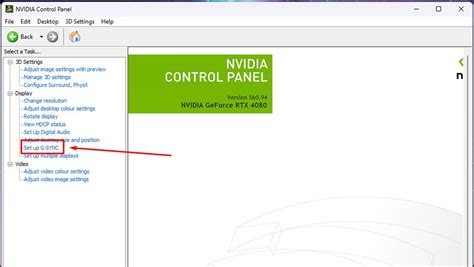
Step 2: Enable G-Sync in NVIDIA Control Panel
- Right-click on your desktop and select ‘NVIDIA Control Panel.’
- In the left-hand menu, under ‘Display,’ click on ‘Set up G-SYNC.’
- Check the box for ‘Enable G-SYNC, G-SYNC Compatible.’
- Select your G-Sync compatible display (if you have multiple monitors).
- Choose ‘Enable for full screen mode’ or ‘Enable for windowed and full screen mode’ (the latter is generally recommended).
- Click ‘Apply.’
Verifying G-Sync/FreeSync Functionality
Once you’ve enabled the settings, it’s a good idea to confirm that adaptive sync is active:
- NVIDIA: In the NVIDIA Control Panel, go to ‘Display’ > ‘Set up G-SYNC.’ In the top menu bar, click ‘Display’ and check ‘G-SYNC Indicator.’ When active in a game, a small ‘G-SYNC’ overlay will appear on your screen.
- AMD: While AMD Radeon Software doesn’t have a built-in indicator like NVIDIA’s, you can often find a frame rate counter in your monitor’s OSD (check the ‘Gaming’ section). When FreeSync is active, you should observe the frame rate counter tracking your in-game FPS, confirming synchronization.
- Test Applications: Utilize online G-Sync/FreeSync test demos (e.g., NVIDIA’s Pendulum Demo, various FreeSync test utilities) to visually confirm tear-free motion.
Common Troubleshooting Tips
- Ensure High Refresh Rate: Make sure your monitor is set to its highest refresh rate (e.g., 144Hz, 240Hz) in Windows Display Settings.
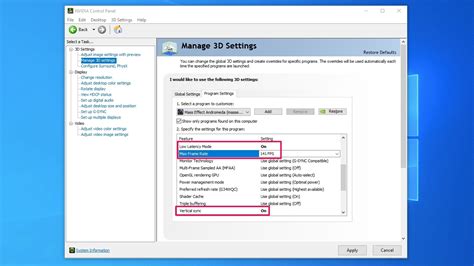
- Frame Rate Caps: While adaptive sync prevents tearing, it works best within a specific frame rate range. Use in-game or driver-level frame rate caps (e.g., NVIDIA’s Max Frame Rate) to keep your FPS slightly below your monitor’s maximum refresh rate (e.g., 141 FPS for a 144Hz monitor) to avoid reintroducing latency or tearing above the sync range.
- Check Cables: A faulty or incompatible cable can prevent adaptive sync from working. Try a different DisplayPort or HDMI cable.
- Monitor Firmware: Occasionally, monitor manufacturers release firmware updates to improve adaptive sync compatibility or performance. Check your monitor manufacturer’s website.
- Disable V-Sync in Games (Generally): With G-Sync/FreeSync enabled, you typically want V-Sync off in game settings to avoid input lag. However, for NVIDIA G-Sync users, enabling V-Sync in the NVIDIA Control Panel (but off in-game) can provide a buttery smooth experience with minimal input lag when frame rates exceed the G-Sync range.
Enjoy Tear-Free Gaming!
By following these steps, you should successfully enable G-Sync or FreeSync on your gaming monitor, transforming your gaming experience from choppy and distracting to fluid and immersive. The difference is often night and day, allowing you to fully appreciate the visual fidelity and responsiveness of your games without the distraction of screen tearing.


