


How to optimize RAM speed (XMP/DOCP) for gaming performance?
Random Access Memory (RAM) is a critical component in any gaming PC, directly impacting how smoothly your games run and how quickly your system can access data. While simply having enough RAM is important, optimizing its speed can provide a noticeable boost to frame rates and overall system responsiveness, especially in CPU-intensive games. This guide will walk you through how to unleash your RAM’s full potential using XMP (Extreme Memory Profile) for Intel platforms or DOCP (D.O.C.P. – DRAM Overclocking Profile) for AMD platforms.
Understanding RAM Speed and Its Impact
RAM speed is typically measured in MHz (megahertz) and is often paired with a set of timings (e.g., CL16, CL18). Higher MHz values mean your RAM can transfer data faster, while lower timings indicate quicker responsiveness. For gaming, faster RAM allows your CPU to access game assets and data more rapidly, reducing bottlenecks and improving minimum frame rates and frame pacing. Modern RAM modules, particularly those marketed for gaming, are designed to operate at speeds far beyond the default JEDEC standard.
Out of the box, your RAM might not be running at its advertised speed. This is because motherboards often default to a lower, more universal speed to ensure compatibility. XMP (Intel) and DOCP (AMD) are preset profiles stored on your RAM modules that contain the manufacturer’s tested and validated overclocking settings, allowing your system to run the RAM at its optimal, advertised speed with a single click in the BIOS.

Before You Enable XMP/DOCP
Before diving into your BIOS, there are a few crucial checks to ensure a smooth process:
- Motherboard Compatibility: Verify your motherboard supports XMP/DOCP. Most modern gaming motherboards do, but it’s always good to check your motherboard’s manual or product page.
- RAM Compatibility: Ensure your RAM modules are compatible with your CPU and motherboard. Check the Qualified Vendor List (QVL) on your motherboard manufacturer’s website.
- BIOS Version: Make sure your BIOS is up to date. An outdated BIOS can sometimes lead to instability or prevent XMP/DOCP from working correctly.
- Power Cycle: It’s good practice to fully shut down your PC before entering the BIOS.

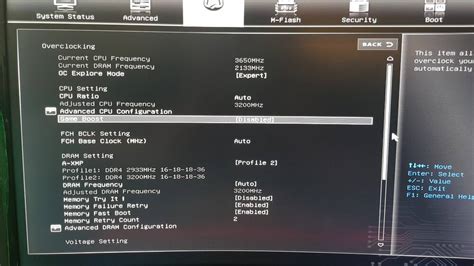
Step-by-Step: Enabling XMP/DOCP in BIOS
The process of enabling XMP/DOCP is largely the same across most motherboard brands, though the exact menu names may vary slightly.
- Enter BIOS/UEFI: Restart your computer and repeatedly press the designated key (usually Del, F2, F10, or F12) during startup to enter your BIOS/UEFI settings.
- Locate the Overclocking/Memory Settings: Once in the BIOS, you’ll typically find these settings under an ‘AI Tweaker’, ‘Extreme Tweaker’, ‘OC’, ‘Advanced’, or ‘Memory Settings’ tab. Many modern BIOS interfaces also have an ‘EZ Mode’ or ‘Simple Mode’ where you can enable XMP/DOCP with a single click.
- Enable XMP/DOCP: Look for an option labeled ‘XMP’, ‘DOCP’, ‘A-XMP’, or ‘Extreme Memory Profile’. It might be a dropdown menu or a toggle. Select ‘Profile 1’ or the highest available profile if there are multiple options. This will automatically apply the advertised speed and timings for your RAM.
- Save and Exit: After selecting the profile, navigate to the ‘Exit’ or ‘Save & Exit’ tab. Choose ‘Save Changes and Reset’ or a similar option. Your system will restart.

Verifying RAM Speed and Performance
Once your system restarts, it’s crucial to verify that XMP/DOCP has been successfully applied and your RAM is running at its advertised speed.
- Task Manager: In Windows, open Task Manager (Ctrl+Shift+Esc), go to the ‘Performance’ tab, and select ‘Memory’. You should see the ‘Speed’ listed, which should now match your RAM’s advertised frequency (e.g., 3200 MHz).
- CPU-Z: For more detailed information, download and run a free utility like CPU-Z. In the ‘Memory’ tab, you’ll see your ‘DRAM Frequency’, which will be half of your advertised speed (e.g., 1600 MHz for 3200 MHz RAM due to DDR – Double Data Rate). The ‘SPD’ tab will show the XMP profiles.
![How To Check RAM Speed On Windows 11 [3 Tested Methods 2024]](/images/aHR0cHM6Ly90czEubW0uYmluZy5uZXQvdGg/aWQ9T0lQLkdTdmRpcjVXeEhCTnBwc1d1WXJaTndIYUV5JnBpZD0xNS4x.webp)
Troubleshooting Common Issues
While enabling XMP/DOCP is usually straightforward, sometimes issues can arise:
- System Instability/Crashes: If your system becomes unstable or crashes after enabling XMP/DOCP, it might indicate that the profile is too aggressive for your CPU’s memory controller or motherboard. Try selecting a slightly lower XMP/DOCP profile if available, or manually inputting slightly lower speeds/higher timings if you’re comfortable with manual overclocking.
- Failure to Boot: If your PC fails to boot after enabling XMP/DOCP, you’ll need to clear your CMOS (Complementary Metal-Oxide-Semiconductor) to reset your BIOS settings to default. This usually involves removing the small button-cell battery on your motherboard for a few minutes or using a dedicated ‘CMOS Clear’ jumper/button on your motherboard. Refer to your motherboard manual for the exact procedure.
Conclusion
Enabling XMP or DOCP is one of the easiest and most effective ways to boost your gaming PC’s performance without additional hardware costs. By simply activating a pre-tested profile, you can ensure your RAM operates at its optimal speed, leading to smoother gameplay, faster load times, and an overall more responsive system. Always proceed with caution, verify your settings, and don’t hesitate to consult your motherboard manual if you encounter any difficulties.