


How to optimize Windows 11 for gaming performance & low latency?
Unleashing Your Gaming Potential on Windows 11
Windows 11, while visually stunning, can sometimes hold back your gaming rig if not properly configured. Achieving optimal gaming performance and the lowest possible latency requires a meticulous approach to system settings, driver management, and background processes. This guide will walk you through the essential steps to transform your Windows 11 machine into a gaming powerhouse, ensuring smoother gameplay and quicker response times.
Essential Windows Settings for Gamers
Activate Game Mode
Windows 11 includes a dedicated Game Mode designed to prioritize your game’s resources. To enable it, navigate to Settings > Gaming > Game Mode and toggle it “On”. This feature helps by preventing Windows Update from installing drivers and sending notifications, and by optimizing system resources specifically for gaming activities.
Manage Focus Assist
Focus Assist (formerly Quiet Hours) can prevent intrusive notifications from popping up during gameplay. Set it to “Alarms only” or “Priority only” when gaming via Settings > System > Focus assist to ensure an uninterrupted experience. This minimizes distractions and keeps your concentration on the game.
Graphics and Driver Optimization
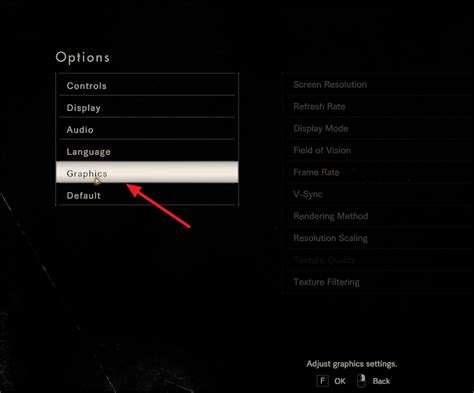
Enable Hardware-accelerated GPU Scheduling
This feature allows your GPU to manage its own video memory, potentially reducing latency and improving performance. Go to Settings > System > Display > Graphics > Change default graphics settings and turn “Hardware-accelerated GPU scheduling” On. You’ll need to restart your PC for changes to take effect. Ensure your graphics drivers are up to date, as this feature relies on modern driver support.
Update Graphics Drivers Regularly
Outdated GPU drivers are a common bottleneck for gaming performance. Always download the latest drivers directly from NVIDIA, AMD, or Intel’s official websites. These updates often include significant performance enhancements, stability improvements, and bug fixes specifically for new game titles and existing popular games.

Power and Background Process Management
Set Power Plan to High Performance
Navigate to Control Panel > Hardware and Sound > Power Options. Select “High Performance” or “Ultimate Performance” if available. This ensures your CPU and GPU operate at their maximum clock speeds, preventing throttling during intense gaming sessions where every bit of processing power counts.
Disable Startup Programs and Background Apps
Many applications launch with Windows and run in the background, consuming valuable CPU, RAM, and network resources. Open Task Manager (Ctrl+Shift+Esc), go to the “Startup” tab, and disable unnecessary programs. Additionally, review background apps in Settings > Apps > Background apps and turn off those you don’t need running constantly to free up system resources for your games.
Storage and Network Tweaks
Optimize Storage Drives
For SSDs, ensure TRIM is enabled (it usually is by default, but it’s worth checking). For HDDs, defragmentation can improve load times, though this is less critical with modern games designed for SSDs. You can manage this via the “Optimize Drives” tool by searching for it in the Start Menu, ensuring your games load quickly and efficiently.
Network Optimization for Low Latency
A stable, fast internet connection is crucial for online gaming. Use a wired Ethernet connection instead of Wi-Fi whenever possible to minimize latency and packet loss. Within Windows, consider disabling “Network throttling” (though this is an advanced registry edit) or prioritizing game traffic through Quality of Service (QoS) settings on your router, if supported, to ensure your game’s data gets priority.

Advanced Windows 11 Optimizations
Disable Virtualization-Based Security (VBS) and Core Isolation
While important for security, VBS and Core Isolation can sometimes introduce a slight performance overhead in games. If maximum performance is your priority and you understand the security implications, you can disable them in Settings > Privacy & security > Windows Security > Device security > Core isolation details. Remember to re-enable them if security becomes a higher concern for everyday use.
Adjust Visual Effects for Performance
Go to System > Advanced system settings, then under “Performance,” click “Settings.” Select “Adjust for best performance” or customize options to disable unnecessary visual flair like animations, shadows, and fading effects. Sacrificing some visual smoothness in the operating system can translate to better in-game frame rates and responsiveness.
Conclusion
Optimizing Windows 11 for gaming is an ongoing process of tweaking and testing. By systematically applying these settings, from activating Game Mode to managing background processes and keeping drivers up-to-date, you can significantly boost your frame rates, reduce input lag, and enjoy a smoother, more responsive gaming experience. Remember to restart your PC after major changes and test your game performance to find the perfect balance for your specific system and gaming habits. Consistent maintenance will help keep your PC in top gaming shape.


