How to safely install game mods and avoid conflicts?
Unlock New Worlds: The Art of Safe Modding
Modding can dramatically enhance your gaming experience, introducing new content, improving graphics, or even completely overhauling gameplay mechanics. However, venturing into the world of game modifications without caution can lead to frustrating crashes, corrupted save files, or even introduce security risks. This guide will walk you through the essential steps to safely install game mods and skillfully navigate potential conflicts, ensuring your virtual adventures remain stable and enjoyable.
Essential Pre-Installation Steps
Before you even think about downloading your first mod, preparation is key. Start by backing up your game’s vanilla installation and any existing save files. This crucial step acts as your safety net, allowing you to revert to a working state if anything goes wrong. Next, thoroughly research any mod you intend to install. Check user reviews, compatibility notes, and required dependencies. Some mods require other specific mods to function, while others may be incompatible with certain versions of the game or other popular mods. Understanding your game’s file structure—where executables, data folders, and save files are located—will also prove invaluable.

The Indispensable Role of Mod Managers
For most modern games with active modding communities, a mod manager is your best friend. Tools like Vortex, Mod Organizer 2 (MO2), or Nexus Mod Manager (NMM) streamline the installation process, manage load orders, and often help detect and resolve conflicts. Mod managers typically install mods into a virtual folder or a separate directory, keeping your game’s core files pristine. This makes activation, deactivation, and uninstallation much cleaner and safer.
Using a Mod Manager: A Quick Guide
- Download and Install: Get the appropriate mod manager for your game (often recommended on popular modding sites like Nexus Mods).
- Configure: Point the manager to your game’s installation directory.
- Download Mods: Many managers can directly download and install mods from supported websites.
- Activate: After downloading, activate the mod within the manager.
- Manage Load Order: This is critical for preventing conflicts. Most managers have built-in tools or suggest optimal load orders.

Manual Installation: When and How to Proceed with Caution
While mod managers are preferred, some older games, or very niche mods, might require manual installation. This involves directly copying mod files into your game’s directories. If you must go this route:
- Read Instructions Carefully: Mod authors will provide specific instructions. Follow them precisely.
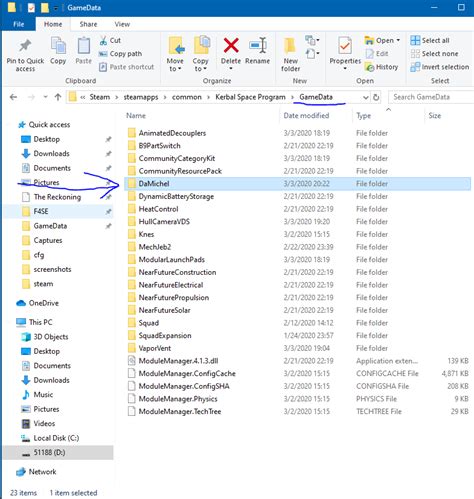
- Understand Overwrites: Manual installation often means overwriting existing game files. Be aware of what files are being replaced.
- Keep Originals: Always make a separate backup of any vanilla files a mod instructs you to replace.
- Small Steps: Install one mod at a time and test thoroughly before adding another.
Identifying and Resolving Mod Conflicts
Conflicts occur when two or more mods try to modify the same game file or script in incompatible ways. Symptoms can range from minor graphical glitches and broken quests to immediate game crashes upon startup or loading a save. Identifying conflicts is often the hardest part of modding.
Common Causes of Conflicts:
- File Overwrites: Two mods attempt to use or modify the same file.
- Script Incompatibility: Mods altering the same game scripts can break functionality.
- Load Order Issues: The order in which mods are loaded determines which changes take precedence.
Strategies for Resolution:
- Load Order Optimization: Your mod manager will often have a tool to sort mods based on dependencies or suggested order (e.g., LOOT for Bethesda games). Generally, more extensive overhauls go first, followed by smaller additions, with patches for specific conflicts loaded last.
- Patching: Many mod authors create compatibility patches to make their mods work together with other popular ones. Always look for these.
- Trial and Error: If a conflict arises, deactivate recently installed mods one by one until the issue resolves. This helps isolate the culprit.
- Conflict Detection Tools: Some games have specific tools (e.g., xEdit for Bethesda games) that allow you to inspect conflicts at a granular level and create custom patches.
Post-Installation: Testing and Troubleshooting
After installing any new mod or batch of mods, always test your game. Load into different areas, try out new features, and ensure everything is working as expected. If you encounter issues, here’s a basic troubleshooting workflow:
- Isolate the Problem: Deactivate all recently added mods. If the game stabilizes, reactivate them one by one until the problem reappears.
- Check Mod Pages: Revisit the mod’s download page for updated information, bug reports, or compatibility notes.
- Consult Game Logs: Many games generate logs that can provide clues about crashes or errors.
- Search Forums: The modding community is vast. Chances are someone else has encountered and solved a similar problem.

Best Practices for a Stable Modded Game
- Start Small: Don’t try to install hundreds of mods at once. Build your mod list gradually.
- Read Everything: Always read the full mod description, installation instructions, and any known issues.
- Keep Up-to-Date: Regularly check for updates to your mods and mod manager.
- Engage with the Community: Don’t hesitate to ask questions on modding forums or the mod authors’ pages.
- Patience is a Virtue: Modding can be time-consuming, especially when troubleshooting. Embrace the process!

Conclusion
Successfully modding your favorite games transforms them into unique, personalized experiences. By adhering to safe installation practices, leveraging powerful mod managers, and understanding how to identify and resolve conflicts, you can minimize frustration and maximize your enjoyment. Approach modding with patience and diligence, and you’ll unlock endless possibilities for your gaming adventures.