


How to set up monitor refresh rates & G-Sync/FreeSync for smooth gaming?

Unlock Ultra-Smooth Gaming: Mastering Refresh Rates and Adaptive Sync
For PC gamers, achieving a fluid and immersive experience often boils down to two critical display technologies: monitor refresh rates and adaptive sync technologies like G-Sync and FreeSync. Misconfigured settings can lead to screen tearing, stuttering, and an overall less enjoyable time, even with a powerful gaming rig. This guide will walk you through the essential steps to properly set up your monitor for peak gaming performance.
Understanding these settings isn’t just for enthusiasts; it’s a fundamental step for anyone looking to get the most out of their gaming monitor and graphics card combination.
What is Monitor Refresh Rate?
Your monitor’s refresh rate, measured in Hertz (Hz), indicates how many times per second the display refreshes its image. A 60Hz monitor refreshes 60 times per second, while a 144Hz monitor refreshes 144 times per second. A higher refresh rate means smoother motion, less ghosting, and a more responsive feel, which is particularly crucial in fast-paced games where every millisecond counts.
While your graphics card generates frames (FPS), your monitor displays them. For the smoothest experience, you want your monitor’s refresh rate to be as high as possible and ideally in sync with your game’s frame rate.
Setting Your Monitor’s Refresh Rate in Windows
Even if you have a high refresh rate monitor, Windows often defaults to 60Hz. You’ll need to manually adjust this to unlock its full potential.
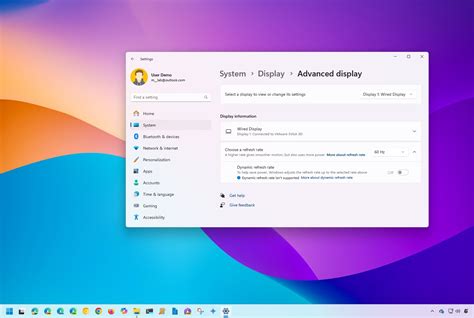
Via Windows Display Settings:
- Right-click on your desktop and select ‘Display settings’.
- Scroll down and click ‘Advanced display settings’.
- Under ‘Choose a refresh rate’, select the highest available option (e.g., 144Hz, 240Hz).
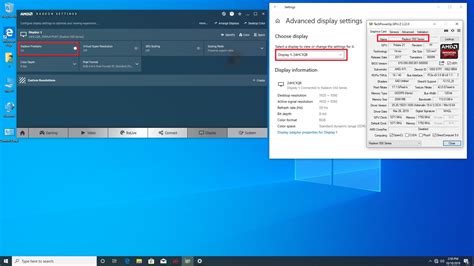
Via Graphics Card Control Panel (Recommended):
For more robust options, use your GPU’s control panel:
- NVIDIA Control Panel: Right-click desktop > ‘NVIDIA Control Panel’ > ‘Change resolution’ under ‘Display’. Select your monitor, then choose the highest refresh rate from the ‘Refresh rate’ dropdown.
- AMD Radeon Software: Right-click desktop > ‘AMD Radeon Software’ > ‘Display’ tab. Find your monitor and adjust the ‘Refresh Rate’ setting.
Always ensure your display cable (DisplayPort or HDMI) supports the desired refresh rate and resolution. DisplayPort is generally preferred for higher refresh rates and resolutions.
Introducing Adaptive Sync: G-Sync and FreeSync
Even with a high refresh rate, if your GPU’s frame rate doesn’t perfectly match your monitor’s refresh rate, you can experience screen tearing or stuttering. This is where adaptive sync technologies come in. G-Sync (NVIDIA’s proprietary solution) and FreeSync (AMD’s open standard) dynamically adjust your monitor’s refresh rate to match the frame rate output by your graphics card. This synchronization eliminates tearing and stuttering, providing an incredibly smooth visual experience.
While G-Sync requires a specific G-Sync module in the monitor and an NVIDIA GPU, FreeSync is more broadly supported by both AMD and more recently, NVIDIA GPUs (as ‘G-Sync Compatible’ over DisplayPort).

Setting Up NVIDIA G-Sync
To enable G-Sync, you need an NVIDIA GeForce graphics card (GTX 10 series or newer), a G-Sync compatible monitor, and a DisplayPort cable connected between your GPU and monitor.
- Ensure your monitor’s OSD (On-Screen Display) has G-Sync enabled. (Refer to your monitor’s manual).
- Right-click on your desktop and open the ‘NVIDIA Control Panel’.
- In the left-hand pane, navigate to ‘Display’ > ‘Set up G-SYNC’.
- Check the box for ‘Enable G-SYNC, G-SYNC Compatible’.
- Select whether you want G-SYNC to work in ‘Full screen mode’ or ‘Windowed and full screen mode’. For the best experience, ‘Windowed and full screen mode’ is usually preferred.
- Click ‘Apply’.
You can verify G-Sync is active by enabling the G-Sync indicator in the ‘Display’ menu of the NVIDIA Control Panel.

Setting Up AMD FreeSync (and G-Sync Compatible)
FreeSync is supported by AMD Radeon graphics cards (Polaris and Vega architectures or newer) and newer NVIDIA GPUs (as G-Sync Compatible over DisplayPort 1.2a or newer). You’ll need a FreeSync compatible monitor and either a DisplayPort or HDMI cable (check monitor specs for HDMI FreeSync support).
- Ensure FreeSync is enabled in your monitor’s OSD (On-Screen Display).
- Right-click on your desktop and open the ‘AMD Radeon Software’.
- Go to the ‘Display’ tab.
- Look for ‘AMD FreeSync’ and toggle it to ‘Enabled’.
- If you have an NVIDIA GPU and a FreeSync monitor, you can enable ‘G-Sync Compatible’ through the NVIDIA Control Panel (following similar steps to G-Sync setup, but specifically for ‘G-SYNC Compatible’ monitors).
Verify your settings within a game or a FreeSync/G-Sync test tool to ensure smooth operation.
Testing and Troubleshooting
Once you’ve configured your refresh rate and adaptive sync, it’s time to test it in a game. Look for visual tearing or stuttering. Many modern games have in-game FPS counters that can help you monitor your frame rate. You can also use tools like NVIDIA’s FrameView or AMD’s Performance Overlay.
Common Issues and Solutions:
- Still getting tearing? Double-check all settings, ensure cables are fully seated and capable, and update GPU drivers.
- G-Sync/FreeSync not appearing? Make sure your monitor’s OSD has the feature enabled and you’re using the correct cable (often DisplayPort is required).
- Monitor stuck at 60Hz? Revisit your Windows and GPU control panel settings.
Conclusion
Properly setting your monitor’s refresh rate and enabling G-Sync or FreeSync can dramatically enhance your gaming experience, providing a level of smoothness and responsiveness that you simply can’t achieve with default settings. By following these steps, you’ll eliminate visual distractions and immerse yourself more fully in your favorite games. Enjoy the silky-smooth visuals and sharper gameplay!


