Mod CTDs: Best practice for load order conflict resolution?

Understanding CTDs and Load Order Fundamentals
Crashes to Desktop (CTDs) are the bane of any modded game enthusiast. While many factors can contribute to CTDs, an improperly managed load order is frequently the culprit, especially when dealing with a large number of modifications. A ‘load order’ dictates the sequence in which your game loads its various plugins (ESPs, ESMs, ESLs). When two or more mods try to modify the same game record, the one loaded later in the sequence ‘wins’ and overwrites the earlier changes. This is where conflicts arise, leading to unexpected behavior, visual glitches, or, most frustratingly, crashes.
Effective conflict resolution is not just about preventing crashes; it’s about ensuring all your mods work together as intended, creating the cohesive experience you’re striving for. Ignoring load order can turn an exciting modded adventure into a constant battle against instability.

Essential Tools for Conflict Resolution
Before diving into the resolution process, equip yourself with the right tools. These are indispensable for any serious modder:
- Mod Manager (Mod Organizer 2 or Vortex): These are critical for managing your mods, installing them cleanly, and handling file conflicts at the loose file level (textures, meshes, scripts). They also provide virtual file systems, keeping your game’s data folder clean.
- LOOT (Load Order Optimization Tool): LOOT is an intelligent load order sorter that reads your mod list, identifies dependencies, and sorts plugins according to a community-maintained masterlist. It’s the first line of defense against basic load order issues and provides warnings for dirty plugins or potential conflicts.
- xEdit (SSEEdit/FO4Edit/TES5Edit, etc.): This powerful editor allows you to view and modify plugin records. It’s your primary tool for identifying specific conflicts between mods, seeing exactly which records are being overwritten, and creating compatibility patches.
The Step-by-Step Conflict Resolution Process
1. Read Mod Descriptions Thoroughly
The single most important rule. Mod authors often provide crucial information about load order, known incompatibilities, required patches, and recommended installation procedures. Failing to read this can lead to preventable issues.
2. Install Mods Incrementally and Test
Resist the urge to install 100 mods at once. Install a few mods, run LOOT, launch your game, and test for stability. This makes it much easier to pinpoint which new mod (or combination) introduced an issue.
3. Sort with LOOT Regularly
After installing new plugins, always run LOOT. It will automatically sort most of your plugins and flag potential issues. Pay close attention to any warnings or errors LOOT provides; they are often indicators of underlying problems.
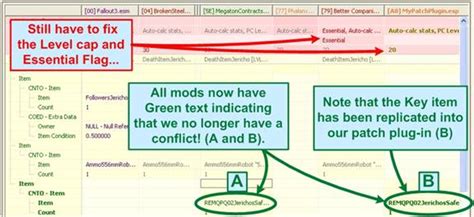
4. Identify Conflicts with xEdit
This is where the real work begins. Open xEdit with your entire load order. Select all your plugins, and once loaded, right-click and choose “Apply Filter for Conflicts.” xEdit will then highlight conflicting records in red (critical) or orange (potential issues). Navigate through these conflicts to understand what’s happening.
5. Create Compatibility Patches (Merge Patches)
Once you’ve identified conflicts in xEdit, you have several options:
- Manual Forwarding: For simple conflicts, you can manually drag and drop specific records or values from one mod to another in a new, empty plugin.
- Automated Merge Patches: For games like Fallout 4 or Skyrim, tools like Mator Smash or Wrye Bash (for older games) can automatically create a ‘Bashed Patch’ or ‘Smashed Patch.’ These tools intelligently merge conflicting records, often preserving the best aspects of multiple mods. While powerful, they may still require manual review in xEdit.
- Specific Compatibility Patches: Many popular mods have community-made compatibility patches that address known conflicts. Always check if one exists before trying to make your own.
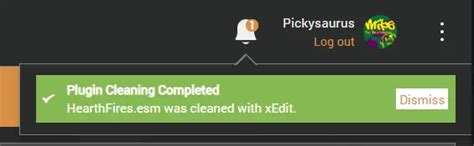
6. Clean “Dirty” Plugins
Some older mods, or even official DLCs, may contain “dirty edits” – unnecessary records that overwrite vanilla game data or introduce unintended changes. LOOT will typically flag these. Use xEdit’s “Remove ITMs” (Identical to Master) and “Undelete and Disable References” functions to clean them. Always backup your plugins before cleaning!
7. Understand ESL-Flagged Plugins
Many modern mods utilize the ESL flag, allowing plugins to take up less space in your load order limit (usually 255 plugins). While beneficial, be aware that ESL-flagged plugins have certain limitations and merge behavior that can sometimes interact differently with traditional ESPs. Most mod managers and tools handle them correctly, but it’s good to be aware.
Advanced Tips for Stability
- Profile Management: Use your mod manager’s profile system to create separate mod setups. This allows you to experiment without corrupting your main playthrough.
- Keep Backups: Before making significant changes or cleaning plugins, always back up your essential files and save games.
- Understand the Game Engine: Some game engines have inherent limitations (e.g., script latency, memory limits) that even perfect load orders can’t entirely overcome. Awareness helps manage expectations.
- Monitor Performance: Tools like Net Script Framework (for Skyrim SE) can provide detailed crash logs, often pointing directly to the problematic mod or file.
Conclusion
Resolving load order conflicts is a skill that improves with practice. It requires patience, attention to detail, and a systematic approach. By consistently using mod managers, LOOT, and xEdit, reading mod descriptions, and testing incrementally, you’ll significantly reduce CTDs and build a more stable, enjoyable modded game. Remember, a perfectly stable mod list with hundreds of mods is an achievable goal, not just a dream.