


My gaming PC overheats: troubleshooting & cooling tips?

An overheating gaming PC can be a frustrating and potentially damaging problem. High temperatures can lead to performance throttling, system instability, crashes, and even long-term damage to expensive components like your CPU and GPU. Identifying the root cause and implementing effective cooling solutions is crucial for maintaining optimal performance and extending the lifespan of your gaming rig.
Recognizing the Signs of an Overheating PC
Before you can fix the problem, you need to confirm that overheating is indeed the issue. Common indicators include:
- Performance Throttling: Your games suddenly run slower, or your PC experiences noticeable stuttering, especially during intense gaming sessions.
- System Crashes: Your computer unexpectedly shuts down, restarts, or freezes entirely.
- Loud Fan Noise: Your case and CPU/GPU fans spin at maximum RPM, producing excessive noise, even during light tasks.
- Hot to the Touch: The exterior of your PC case feels unusually warm or hot.
- Visual Artifacts: Glitches or strange patterns appear on your screen (often indicative of an overheating GPU).

Diagnosing the Problem: Monitoring Temperatures
The first step in troubleshooting is to monitor your PC’s internal temperatures. Several free software tools can help with this:
- HWMonitor / HWiNFO64: Comprehensive monitoring tools for CPU, GPU, motherboard, and storage temperatures.
- MSI Afterburner: Excellent for GPU monitoring and often includes CPU temperature displays.
- Core Temp: Specifically designed for monitoring CPU core temperatures.
Run these tools while gaming or performing demanding tasks to get an accurate picture of your component temperatures. Generally, CPU temperatures above 80-85°C and GPU temperatures above 85-90°C under load indicate a potential overheating issue.
Common Causes of PC Overheating
Once you’ve confirmed overheating, you can start looking for the culprit:
- Dust Accumulation: The most common cause. Dust acts as an insulator, trapping heat and clogging fans, reducing their efficiency.
- Poor Airflow: Inadequate case fan setup or obstructed vents prevent cool air from entering and hot air from exiting.
- Failing Fans: Dead or sluggish case fans, CPU cooler fans, or GPU fans can severely impact cooling.
- Degraded Thermal Paste: Over time, the thermal paste between your CPU/GPU and their respective coolers can dry out and lose effectiveness.
- Aggressive Overclocking: Pushing components beyond their intended limits generates more heat than the cooling system can handle.
- Poor Cable Management: Cluttered cables inside the case can block airflow.
- Environmental Factors: A hot room or placing your PC in an enclosed space can contribute to higher internal temperatures.
Effective Troubleshooting and Cooling Tips
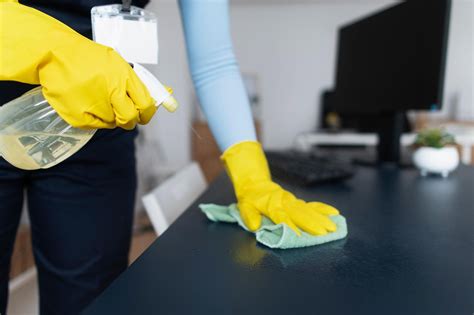
1. Clean Your PC Thoroughly
This is often the easiest and most effective fix. Use compressed air to blow dust out of your case, CPU cooler fins, GPU heatsink, and power supply. Pay special attention to fan blades and any dust filters.
2. Optimize Case Airflow and Fan Configuration
- Intake/Exhaust: Ensure you have a balanced setup with intake fans bringing cool air in (usually front and bottom) and exhaust fans pushing hot air out (usually rear and top).
- Clear Obstructions: Make sure no cables or other components are blocking fan pathways or vents.
- Fan Placement: Experiment with fan placement if possible. A positive pressure setup (more intake than exhaust) can sometimes help keep dust out.
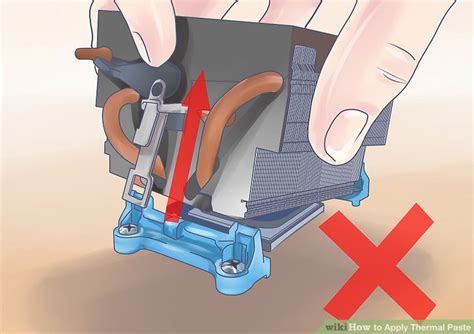
3. Check and Replace Thermal Paste
If your CPU or GPU temperatures remain high after cleaning, the thermal paste might be the issue. This is a more advanced step:
- CPU: Carefully remove your CPU cooler, clean off the old thermal paste from both the CPU IHS (Integrated Heat Spreader) and the cooler’s base with isopropyl alcohol, and apply a new pea-sized dot or line of high-quality thermal paste before reattaching the cooler.
- GPU: Replacing GPU thermal paste is more complex and usually involves disassembling the GPU heatsink. Only attempt this if you are comfortable with such tasks, as it can void warranties.
4. Upgrade Your Cooling Solution
If basic troubleshooting doesn’t suffice, your stock or existing cooling might be inadequate for your components, especially if you have a powerful CPU or GPU.
- CPU Cooler: Consider upgrading from a stock cooler to a more robust air cooler (e.g., Noctua, Cooler Master) or an All-in-One (AIO) liquid cooler.
- Case Fans: Add more case fans or replace existing ones with higher-quality, higher-airflow models.
- Liquid Cooling (Custom Loop): For enthusiasts, a custom liquid cooling loop offers the best performance but is complex and expensive.
5. Improve Cable Management
Route cables neatly behind the motherboard tray or along the case edges to ensure they don’t impede airflow. This can make a surprising difference.
6. Address Environmental Factors
- Room Temperature: A cooler room will naturally lead to a cooler PC.
- PC Placement: Don’t place your PC inside an enclosed cabinet or directly against a wall that blocks exhaust vents. Ensure it has plenty of space for air circulation.
7. Software Solutions & Undervolting
- Driver Updates: Ensure your GPU drivers and chipset drivers are up to date.
- BIOS/UEFI Updates: Sometimes, a BIOS update can improve fan control or power management.
- Undervolting: For advanced users, undervolting your CPU or GPU can reduce power consumption and heat output without significantly impacting performance.

Conclusion
An overheating gaming PC is a solvable problem that requires a systematic approach. By regularly cleaning your system, optimizing airflow, monitoring temperatures, and considering cooling upgrades, you can ensure your gaming rig runs efficiently, quietly, and reliably for years to come. Don’t let high temperatures throttle your gaming experience – take action and keep your components cool!


