


My GPU is overheating. What’s the best airflow setup for a gaming case?
Understanding PC Airflow for Optimal Cooling
Experiencing GPU overheating during intense gaming sessions is a common issue that can significantly impact performance and potentially shorten the lifespan of your components. The core of solving this problem lies in understanding and optimizing your PC case’s internal airflow. Effective airflow ensures that cool air is constantly brought in, hot air is efficiently expelled, and stagnant heat pockets are minimized, particularly around your power-hungry GPU.
The Fundamentals: Intake vs. Exhaust
At its most basic, PC airflow involves intake fans pulling cool air into the case and exhaust fans pushing hot air out. The goal is to create a directional flow of air, typically from front to back and bottom to top, as heat naturally rises. Most modern gaming cases are designed with this principle in mind, featuring mounting points for fans in various locations.
Ideal Fan Placement Strategies
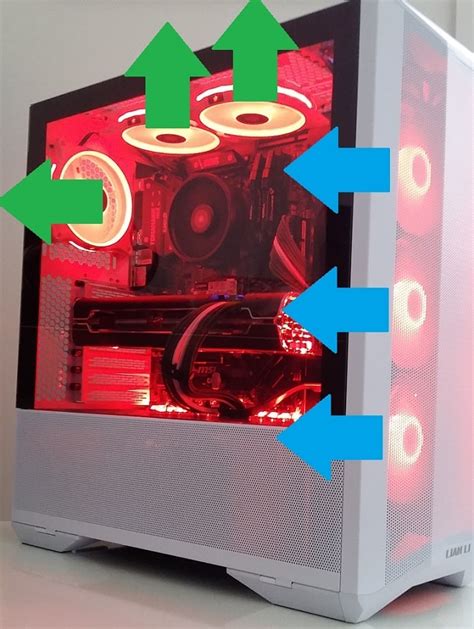
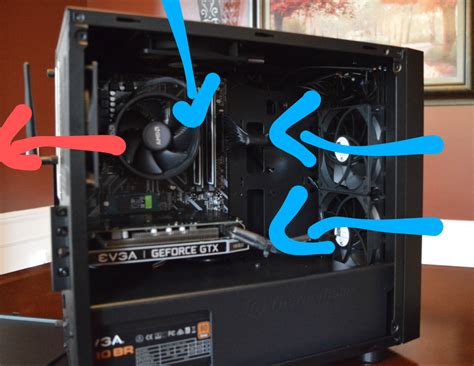
- Front Intake: Typically, two or three fans at the front of the case are set to intake, pulling fresh, cool air directly over your storage drives and towards your GPU.
- Rear Exhaust: A single fan at the rear of the case, usually a 120mm or 140mm, should be set to exhaust, expelling hot air from the CPU and GPU area.
- Top Exhaust: One or two fans at the top of the case, particularly towards the rear, are excellent for exhausting rising hot air, especially if you have an AIO liquid cooler radiator mounted here.
- Bottom Intake (Optional): If your case supports it, a fan at the bottom, especially under the GPU, can provide direct cool air to the GPU’s intake, significantly improving its cooling.
Common Airflow Configurations
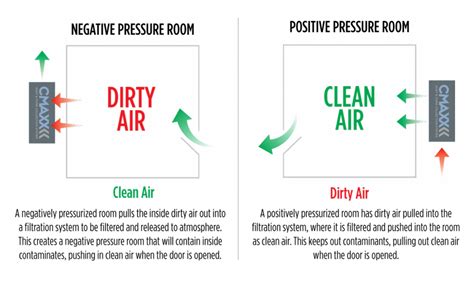
1. Positive Pressure Setup
With more intake fans (or higher CFM intake) than exhaust, a positive pressure setup ensures that air is actively pushed out of any gaps, preventing dust from passively entering through unfiltered openings. This is generally good for dust management and can be effective for cooling, as long as there’s a clear path for hot air to exit.
2. Negative Pressure Setup
More exhaust than intake creates a negative pressure environment, where air is primarily sucked out, and replacement air is pulled in through any available cracks and crevices. While this can be effective for quickly expelling heat, it’s generally not recommended for dust-sensitive users as it can draw unfiltered air and dust into the case.
3. Balanced Pressure Setup (Recommended for Most)
A balanced setup aims for roughly equal intake and exhaust, creating a neutral internal pressure. This configuration, often achieved with a good front intake (2-3 fans) and a combination of rear and top exhaust (2-3 fans), provides excellent heat dissipation while offering reasonable dust control. This is often the best starting point for a high-performance gaming rig.
Beyond Fan Placement: Other Crucial Factors
Even with perfect fan placement, other factors can significantly impact your GPU’s temperature:
- Cable Management: Untidy cables obstruct airflow. Route cables neatly behind the motherboard tray to ensure an unobstructed path for air.
- Dust Filters: Regularly clean your case’s dust filters, especially on intake fans. Clogged filters severely restrict airflow.
- CPU Cooler Orientation: If using an air cooler, ensure it’s oriented to align with the front-to-back airflow path (i.e., fans pushing air towards the rear exhaust).
- GPU Sag: A sagging GPU can subtly impact its cooler’s efficiency. Consider a GPU support bracket.
- Ambient Room Temperature: The cooler your room, the cooler your PC components will be.
Fine-Tuning Your Setup
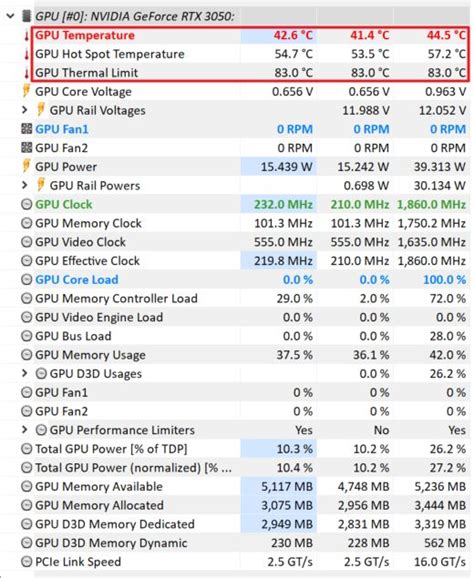
After setting up your fans, monitor your GPU temperatures using software like MSI Afterburner or HWMonitor. Experiment with fan speeds (via your motherboard’s BIOS or fan control software) to find the optimal balance between cooling performance and noise levels. Remember that fan quality and static pressure are also important; high-static pressure fans are better for pushing air through radiators or restrictive areas, while high-airflow fans are great for open spaces.
By implementing a well-thought-out airflow strategy and paying attention to these details, you can significantly reduce your GPU’s operating temperatures, ensuring stable performance and a longer life for your gaming powerhouse.


