


Optimizing Windows settings for maximum gaming performance & lower latency?

Unlocking your PC’s full potential for gaming goes beyond just having powerful hardware. Windows, by default, isn’t always configured for peak gaming performance. By fine-tuning certain system settings, you can significantly reduce input lag, boost frame rates, and ensure a more stable and enjoyable gaming experience. This guide will walk you through the crucial steps to optimize your Windows setup for maximum gaming prowess and lower latency.
Power Plan Configuration: Unleash Full Performance
One of the most immediate impacts you can make is by adjusting your power plan. Windows’ default ‘Balanced’ plan conserves energy, often at the cost of performance. Switching to a ‘High Performance’ or, if available, ‘Ultimate Performance’ plan ensures your CPU and GPU consistently run at their maximum clock speeds.
To do this: Open the Start Menu, search for ‘Edit power plan’, then click ‘Power Options’ in the Control Panel window. Select either ‘High Performance’ or ‘Ultimate Performance’. If ‘Ultimate Performance’ isn’t visible, you might need to enable it via a Command Prompt (Admin) command: powercfg -duplicatescheme e9a42b02-d5df-448d-aa00-03f533f6fdae, then refresh your power options.
Game Mode and Graphics Settings: Tailored for Gaming
Windows Game Mode, introduced in Windows 10, is designed to prioritize your gaming experience by limiting background processes and allocating more resources to your game. While its effectiveness can be debated for high-end systems, it’s generally good practice to keep it enabled.
To enable Game Mode: Go to ‘Settings’ > ‘Gaming’ > ‘Game Mode’ and toggle it ‘On’.
Furthermore, Windows allows you to specify GPU preference for individual applications. Navigate to ‘Settings’ > ‘System’ > ‘Display’ > ‘Graphics settings’. Here, you can add your game executables and set them to ‘High performance’ mode, ensuring they utilize your dedicated graphics card.
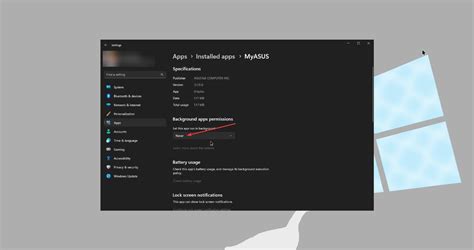
Disable Background Apps and Notifications: Minimize Resource Hogs
Background applications can silently consume CPU cycles, RAM, and network bandwidth, directly impacting your game’s performance. Minimizing these distractions is crucial.
To manage background apps: Go to ‘Settings’ > ‘Privacy’ > ‘Background apps’. You can either toggle off ‘Let apps run in the background’ entirely or selectively disable individual apps you don’t need running in the background.
Additionally, distracting notifications can pull you out of intense moments or consume system resources. Configure ‘Focus assist’ (‘Settings’ > ‘System’ > ‘Focus assist’) to automatically turn on during gaming or disable notifications entirely (‘Settings’ > ‘System’ > ‘Notifications & actions’).
Update Graphics Drivers: The Foundation of Performance
Your graphics card drivers are perhaps the most critical component for gaming performance. NVIDIA, AMD, and Intel regularly release optimized drivers that improve performance, fix bugs, and add support for new games. Always ensure you are running the latest stable drivers directly from your GPU manufacturer’s website.
While you’re at it, also check for updates to your motherboard’s chipset drivers, which can affect overall system stability and performance.
Network Optimization for Lower Latency: The Unsung Hero
For online gaming, latency (ping) is just as important as FPS. A wired Ethernet connection is always superior to Wi-Fi for stability and lower latency. If you must use Wi-Fi, ensure your router is optimized and consider using 5GHz band if possible.
You can also adjust your network adapter’s settings. Open ‘Device Manager’ > ‘Network adapters’, right-click your adapter, select ‘Properties’ > ‘Advanced’. Look for settings like ‘Jumbo Frame’ (disable for gaming) and ‘Power Saving Mode’ (disable). Some advanced users might consider tweaking QoS (Quality of Service) settings on their router to prioritize game traffic.

Adjust Visual Effects for Performance: Prioritize Speed Over Aesthetics
Windows’ visual flair, while aesthetically pleasing, consumes system resources. By adjusting these visual effects, you can free up valuable CPU and GPU cycles.
To do this: Search for ‘Adjust the appearance and performance of Windows’ in the Start Menu. In the ‘Performance Options’ window, select ‘Adjust for best performance’. Alternatively, you can choose ‘Custom’ and selectively enable only essential visual effects you prefer, like ‘Smooth edges of screen fonts’. Also, consider disabling ‘Transparency effects’ in ‘Settings’ > ‘Personalization’ > ‘Colors’.

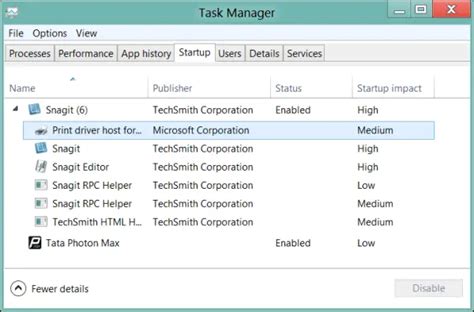
Startup Programs and Disk Maintenance: Keep Your System Lean
Many applications automatically launch with Windows, slowing down your boot time and consuming resources. Manage these via Task Manager. Press Ctrl + Shift + Esc, go to the ‘Startup’ tab, and disable any non-essential programs.
Regular disk maintenance is also vital. Use ‘Disk Cleanup’ to remove temporary files. For SSDs, ensure TRIM is enabled (it usually is by default) and avoid manual defragmentation. For traditional HDDs, periodic defragmentation can improve load times.
Conclusion: Consistent Maintenance is Key
Optimizing Windows for gaming is not a one-time task but an ongoing process. Regularly updating drivers, managing background processes, and performing routine system maintenance will ensure your PC consistently delivers peak performance. By implementing these tweaks, you’ll not only enjoy higher frame rates and lower latency but also a more stable and responsive gaming environment, allowing you to fully immerse yourself in your favorite titles.


