


What are essential Windows 11 settings for max gaming performance & low latency?

Optimizing Windows 11 for Peak Gaming Performance
Windows 11, while offering a sleek interface and modern features, can sometimes hold back your gaming rig’s true potential if not configured correctly. Achieving maximum gaming performance and the lowest possible latency requires a deep dive into various system settings. By fine-tuning these critical aspects, you can ensure your CPU and GPU are fully utilized, background processes are minimized, and input lag is reduced to the bare minimum, providing a smoother, more responsive gaming experience.
Enable Game Mode
Game Mode is Windows 11’s dedicated feature to prioritize your game. When enabled, it focuses system resources on your game, preventing Windows Update from installing drivers and reducing background task interference. This ensures that your game receives the maximum CPU and GPU cycles available.
To enable it:
- Go to Settings > Gaming > Game Mode.
- Toggle Game Mode to On.
Adjust Graphics Settings for Performance
Hardware-accelerated GPU Scheduling
This feature allows your GPU to manage its own VRAM, potentially reducing latency and improving performance. It offloads some GPU scheduling tasks from the CPU, freeing up resources.
- Go to Settings > System > Display > Graphics.
- Click Change default graphics settings.
- Toggle Hardware-accelerated GPU scheduling to On. (Requires a restart)
Per-App Graphics Performance Preference
You can specify which GPU (if you have multiple, like integrated and discrete) and performance mode your games should use.
- Go to Settings > System > Display > Graphics.
- Under “Add an app,” select Desktop app, then click Browse to find your game’s executable (e.g.,
.exefile). - Once added, click Options and select High performance.
Set Power Mode to High Performance or Ultimate Performance
The default balanced power plan often limits CPU performance to save energy. For gaming, you want your CPU running at full clock speed.
- Go to Settings > System > Power & battery.
- Under “Power mode,” select Best performance.
- For more granular control, search for “Edit power plan” in the Windows search bar, then click Power Options.
- Select High Performance or, if available on your system (often via AMD or Intel chipset drivers), Ultimate Performance.
Disable Unnecessary Notifications and Focus Assist
Pop-up notifications can be distracting and even cause micro-stutters. Focus Assist helps silence these interruptions.
- Go to Settings > System > Notifications.
- Toggle Notifications to Off or customize which apps can send them.
- Go to Settings > System > Focus.
- Set it to On and configure rules, such as automatically turning on when playing a game.

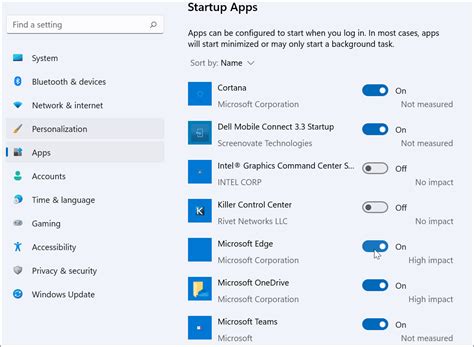
Manage Startup Apps and Background Processes
Too many programs launching with Windows or running in the background can hog valuable RAM and CPU cycles.
- Open Task Manager (Ctrl+Shift+Esc).
- Go to the Startup tab and disable any non-essential applications.
- Go to the Processes tab and identify any high-resource background apps you don’t need running while gaming, then close them.
- Go to Settings > Apps > Apps & features, click the three dots next to an app, then Advanced options. Limit background app permissions for apps that don’t need to run constantly.
Optimize Network Settings
Low latency in online gaming relies heavily on network performance. Ensure your network drivers are up to date and consider disabling QoS Packet Scheduler if you’re experiencing lag, as it can sometimes prioritize other traffic over game data.
- Search for “Network Connections” and open View network connections.
- Right-click your active network adapter (Ethernet or Wi-Fi) and select Properties.
- Uncheck QoS Packet Scheduler.
- Ensure your network adapter drivers are the latest version from the manufacturer’s website.
Update Drivers Regularly
This is arguably one of the most crucial steps. Outdated graphics, chipset, and network drivers can severely limit performance and introduce instability.
- Graphics Drivers: Download the latest drivers directly from NVIDIA, AMD, or Intel.
- Chipset Drivers: Get these from your motherboard manufacturer’s website.
- Network Drivers: Also from your motherboard manufacturer or Wi-Fi/Ethernet card manufacturer.
- Audio Drivers: Ensure these are up-to-date, especially if you use high-end audio equipment.
Disable Unnecessary Visual Effects
While Windows 11 looks good, some visual effects consume resources that could be better used by your game.
- Search for “Adjust the appearance and performance of Windows” and open it.
- In the Visual Effects tab, select Adjust for best performance. You can then selectively re-enable effects you find necessary, like “Smooth edges of screen fonts.”
Turn Off Xbox Game Bar and Game DVR (If Not Used)
The Xbox Game Bar and its Game DVR feature, while useful for some, can consume resources in the background. If you don’t use them, disable them.
- Go to Settings > Gaming > Xbox Game Bar and toggle it Off.
- Go to Settings > Gaming > Captures and ensure background recording is Off.

Conclusion
By systematically going through these Windows 11 settings, you can significantly enhance your gaming performance and reduce latency. Remember that optimization is an ongoing process. Regularly update your drivers, keep your system clean, and periodically review these settings to ensure your PC remains a finely tuned gaming machine. A smoother, more responsive gaming experience awaits!


