


Windows 11 gaming optimization: Best settings for max FPS & low input lag?

Windows 11, while visually polished, can sometimes hoard resources that could otherwise be dedicated to your favorite games. To truly dominate the battlefield or immerse yourself in vast open worlds, optimizing your operating system is just as crucial as having powerful hardware. This guide will walk you through the essential Windows 11 settings to tweak for a significant boost in FPS and a noticeable reduction in input lag.
Unlock Peak Gaming Performance in Windows 11
Before diving into specific settings, it’s important to understand that optimization is a balancing act. While chasing every last frame is tempting, some settings might marginally impact visual fidelity. Our goal here is to strike a balance that prioritizes raw performance and responsiveness without turning your games into pixelated messes.
Core Windows 11 Settings for Gaming
1. Activate Game Mode
Windows 11’s Game Mode is designed to optimize your PC for gaming by prioritizing game processes and suspending background tasks. It’s often enabled by default, but it’s worth double-checking.
- Go to Settings > Gaming > Game Mode.
- Ensure the toggle is set to On.
2. Enable Hardware-accelerated GPU Scheduling (HAGS)
HAGS can reduce latency and improve performance by allowing the GPU to manage its own video memory more efficiently. This feature requires a modern GPU (NVIDIA GTX 10-series or newer, AMD Radeon RX 5000-series or newer) and the latest graphics drivers.
- Go to Settings > System > Display > Graphics > Change default graphics settings.
- Toggle Hardware-accelerated GPU scheduling to On.
- Restart your PC for changes to take effect.
3. Adjust Power Plan for Performance
Your power plan dictates how your CPU and other components perform. For gaming, you want maximum power delivery.
- Search for “Power Plan” in the Windows search bar and select Choose a power plan.
- Select High performance or, if available, Ultimate Performance (often found in newer systems or via a registry tweak).
- For laptops, ensure you’re plugged into AC power for optimal performance.
Display and Graphics Optimizations
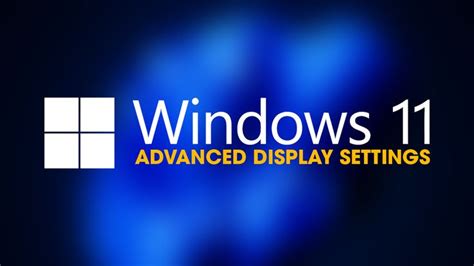
4. Set High Refresh Rate and Enable VRR (Variable Refresh Rate)
Ensure your monitor is running at its advertised refresh rate, and if it supports VRR (like G-Sync or FreeSync), make sure it’s enabled.
- Go to Settings > System > Display > Advanced display.
- Under “Choose a refresh rate,” select the highest available option for your monitor.
- For VRR, ensure it’s enabled both in Windows (often under graphics settings, if applicable) and your GPU control panel (NVIDIA Control Panel or AMD Radeon Software).
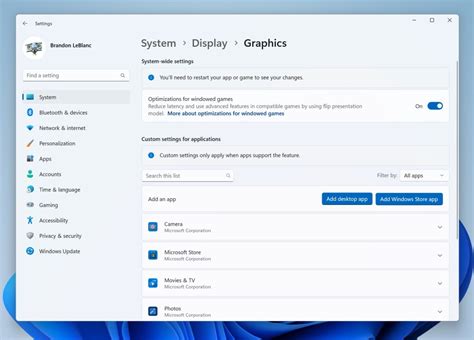
5. Per-App Graphics Performance Preference
You can tell Windows to prioritize specific games to use your dedicated graphics card for optimal performance.
- Go to Settings > System > Display > Graphics.
- Click Browse and locate your game’s executable file (e.g.,
GameName.exe). - Once added, click on the game, select Options, and choose High performance, then Save.
6. Disable Unnecessary Visual Effects
While Windows 11 looks great, some visual bells and whistles can consume resources. Disabling them frees up CPU/GPU cycles.
- Search for “Adjust the appearance and performance of Windows” in the search bar.
- In the Performance Options window, select Adjust for best performance or manually uncheck items like “Animate windows when minimizing and maximizing,” “Fade or slide menus into view,” and “Show shadows under windows.”
Input and Background Process Management
7. Optimize Mouse and Input Settings
For low input lag, especially in competitive games, fine-tune your mouse settings.
- Search for “Mouse settings” and then click “Additional mouse settings.”
- Go to the Pointer Options tab and uncheck Enhance pointer precision. This setting adds acceleration, which can be inconsistent for gaming.
- If your mouse has its own software, ensure its polling rate is set to the highest possible (e.g., 1000Hz).
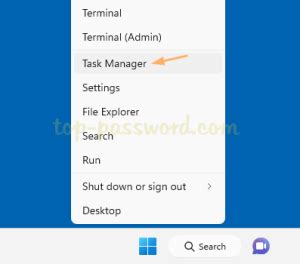
8. Manage Startup Apps and Background Processes
Too many apps launching with Windows or running in the background can hog CPU, RAM, and network resources.
- Open Task Manager (Ctrl+Shift+Esc), go to the Startup tab, and disable unnecessary programs.
- Go to Settings > Apps > Apps & features and review installed applications. Uninstall anything you don’t use.
- Under Settings > Apps > Background apps (or check app permissions in Settings > Privacy & security), turn off background permissions for apps you don’t need running constantly.
Driver Updates and System Maintenance
9. Keep Drivers Up-to-Date
Outdated drivers, especially for your GPU, can severely hinder performance and cause stability issues. Always ensure you have the latest drivers from your manufacturer’s website (NVIDIA, AMD, Intel).
- Regularly check for updates from your GPU manufacturer.
- Also, ensure your chipset drivers and audio drivers are up-to-date.
10. Storage Optimization
A fast storage drive is crucial for quick load times. If you’re gaming on an SSD or NVMe drive, ensure it has enough free space (ideally 15-20% free) for optimal performance. Regular disk cleanup can also help.
- Search for “Disk Cleanup” and run it to remove temporary files.
- For HDDs, run Disk Defragmenter periodically (not recommended for SSDs).

Conclusion
By implementing these Windows 11 optimization tips, you’ll create a leaner, more efficient gaming environment. Remember that the best settings can vary slightly depending on your hardware configuration and the specific games you play. After applying these changes, launch your favorite games, monitor your FPS, and feel the difference in responsiveness. Experiment with what works best for your system to achieve that sweet spot of maximum frame rates and buttery-smooth, low-latency gameplay.


