How to minimize mod conflicts post-game update for stable play?
The Inevitable Clash: Game Updates vs. Your Modded Experience
For many PC gamers, mods are an essential part of extending a game’s lifespan, enhancing graphics, or adding new gameplay mechanics. However, this vibrant ecosystem often faces a significant challenge: game updates. A new patch, especially one that changes core game files, can wreak havoc on your carefully curated mod list, leading to crashes, broken features, or even unplayable save files. Understanding why these conflicts occur and having a systematic approach to managing them is key to maintaining a stable and enjoyable modded experience.

Game developers constantly refine their code, add new content, and fix bugs. These changes often alter the very files that mods interact with. When a mod designed for an older game version tries to interact with a newly updated file, it can cause a mismatch, leading to unexpected behavior or outright game failure. The good news is that with some foresight and a structured approach, you can significantly reduce the downtime and frustration.
Pre-Update Preparedness: Your First Line of Defense
Minimizing mod conflicts starts long before an update hits. Proactive measures can save you hours of troubleshooting later:
- Back Up Everything: This is paramount. Back up your game’s entire installation folder and your save files. If things go sideways, you can always revert to a working state. Many mod managers also offer backup features for your mod profiles.
- Maintain a Mod List: Keep a record of all your installed mods, their versions, and where you downloaded them from. A simple spreadsheet or text file can be invaluable when you need to re-download or check for updates.
- Read Patch Notes: Before you even let the game update, try to find the official patch notes. Look for changes to core systems, UI, or assets that are likely to affect mods. This can give you an early warning about which mods might break.
- Avoid Automatic Updates: If possible, disable automatic updates for your game. This gives you control over when the update happens, allowing you to prepare your modding environment.

Post-Update Protocol: Strategic Conflict Resolution
Once the game has updated, follow these steps to methodically bring your modded game back to life:
- Disable All Mods: The very first step is to launch the game without any mods active. This confirms that the base game is working correctly after the update. If the vanilla game still crashes, you have a bigger issue that isn’t mod-related (e.g., corrupted game files, driver issues).
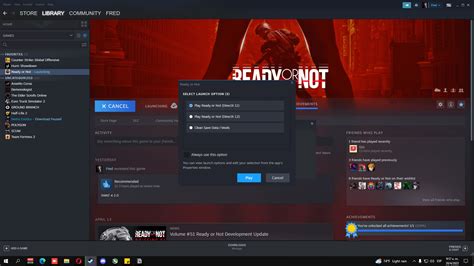
- Verify Game Files: Use your game launcher (Steam, Epic Games Store, etc.) to verify the integrity of the game files. This ensures that the update installed correctly and no files are missing or corrupted.
- Update Mod Manager/Tools: If you use a mod manager (like Vortex, Mod Organizer 2, Nexus Mod Manager), ensure it’s updated to its latest version. These tools often receive updates to support new game versions.
- Check Mod Compatibility & Updates: This is the most time-consuming step. Visit the mod pages for each of your installed mods. Look for developer announcements regarding compatibility with the new game version or new mod updates. Prioritize mods that are critical to your gameplay experience.
- Install Updated Mods: Install any updated versions of your mods. Always follow the installation instructions carefully, as they might change with new game versions.
Incremental Loading: The Slower, Smarter Way
Once you have a handful of updated mods, resist the urge to re-enable everything at once. Instead, load them incrementally:
- Load Critical Mods First: Start by enabling only your most essential mods. Launch the game, test extensively, and ensure stability.
- Add Mods in Batches: Once critical mods are stable, add small batches of other mods (e.g., 5-10 at a time, or by category like textures, then gameplay overhauls). After each batch, launch the game and test thoroughly. This helps you pinpoint which specific mod or combination of mods is causing a conflict.
- Use Conflict Detection Tools: Some mod managers and specific game modding communities offer tools (e.g., LOOT for Bethesda games) that can detect potential conflicts or incorrect load orders. Utilize these where available.
Advanced Strategies for the Persistent Modder
- Clean Saves: Sometimes, even after updating mods, an old save file can be corrupted by previous mod data. Starting a new game after a major update and mod overhaul can sometimes be the cleanest way to proceed.
- Community Resources: Don’t hesitate to consult game-specific modding forums, Reddit communities, or Discord servers. Other players often encounter similar issues and share solutions or workarounds quickly.
- Learn Basic Debugging: Familiarize yourself with crash logs or error messages the game might generate. These can often point you directly to the offending mod or file.
- Separate Game Installations: For heavily modded games, some users maintain separate installations or game versions to avoid update conflicts entirely, though this requires significant disk space.
Conclusion
Managing mod conflicts after a game update requires patience, a systematic approach, and a bit of detective work. By being prepared, following a careful post-update protocol, and leveraging community knowledge, you can quickly get your favorite modded games back up and running. Remember, the modding community is often a game’s greatest asset – and sometimes, its greatest challenge. Embrace the process, and you’ll be enjoying stable, enhanced gameplay in no time.