Stop mod conflicts: How to prepare for game updates?

The thrill of a new game update can quickly turn into frustration when your beloved modded experience crumbles. From broken saves to endless crashes, mod conflicts are a common headache for PC gamers. But what if you could sidestep most of these issues with a bit of foresight? Preparing your game for an upcoming patch is not just about avoiding conflicts; it’s about preserving your immersive world and ensuring a smooth transition. This guide will walk you through the essential steps to protect your modded game from the inevitable disruption of official updates.
Why Game Updates Break Mods
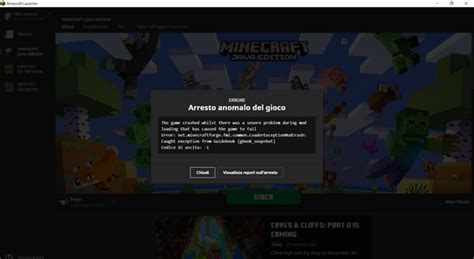
Game developers constantly tweak their code, fix bugs, and add new features. While beneficial for the vanilla game, these changes often interact negatively with modifications. Mods frequently rely on specific game files, scripts, or internal APIs. When a game update alters these underlying structures, mods that haven’t been updated to match can become incompatible, leading to errors, missing assets, or outright game failures. Understanding this fundamental conflict is the first step toward effective prevention.

Step 1: Backup Everything (The Golden Rule)
Before any major game update lands, your most critical defense is a comprehensive backup. This isn’t just about your game saves; it’s also about your entire mod setup and potentially the game installation itself. Create a copy of your ‘Saves’ folder, usually found in ‘My Documents’ or within the game’s installation directory. More importantly, backup your entire ‘Mods’ folder or the working directory of your mod manager. For heavily modded games, consider making a complete copy of the game’s installation folder – especially if you’re not using a mod manager that virtualizes your mods. This provides a clean rollback point if everything goes awry.

Step 2: Stay Informed and Engaged
Knowledge is power. Follow your favorite mod authors on their respective platforms (Nexus Mods, official forums, Discord). Many modders will announce their plans for update compatibility or alert users to potential issues. Pay attention to official game developer announcements regarding upcoming patches, especially if they mention significant engine changes or overhauls that could impact modding. Subscribing to community discussions or specific game subreddits can also give you early warnings and solutions from fellow players.
Step 3: Leverage a Mod Manager
For almost any moddable game, a good mod manager is indispensable. Tools like Vortex, Mod Organizer 2 (for Bethesda games), or simply a robust manual system can dramatically simplify the process of enabling, disabling, and organizing your mods. A key feature of many managers is their ability to create separate profiles or virtualize your mod installations, keeping your game’s core files pristine. This makes it far easier to disable all mods with a single click before an update and re-enable them selectively afterward.

Step 4: Disable All Mods Before Updating
The safest approach is to go into an update with a “clean” game. Before you allow the game client (Steam, Epic, GOG) to download and apply the patch, disable all your mods. If your mod manager supports profiles, switch to a vanilla profile. If you’re managing mods manually, move your mod folders out of the game’s directory or rename them temporarily. This ensures the update applies cleanly to the base game, reducing the chances of corrupted files or unexpected interactions during the patching process.
Step 5: Test Mods in Batches Post-Update
Once the game update is installed and you’ve confirmed the vanilla game runs without issue, it’s time to reintroduce your mods. Do NOT enable everything at once. Start with essential framework mods (like script extenders or API loaders) and then enable your other mods in small batches. Launch the game after each batch to check for stability. This methodical approach helps you pinpoint which specific mod or combination of mods might be causing conflicts with the new patch, making troubleshooting much easier. Prioritize mods you absolutely can’t play without first.

Step 6: Utilize Rollback Options Where Available
Some game platforms offer ways to roll back to a previous game version. Steam, for example, often has “beta branches” that contain older stable builds of a game, allowing you to stay on a compatible version until your essential mods are updated. GOG often provides direct downloads for previous game versions. While not always ideal, this can be a lifesaver for games where mod updates are slow, or a critical mod might never be updated. Always check if this option is available for your game.
Conclusion: The Payoff of Preparation
Preparing for game updates might seem like an extra chore, but the time invested upfront can save you countless hours of frustration and debugging. By backing up your files, staying informed, utilizing mod managers, and carefully reintroducing your mods, you transform the update experience from a dreaded event into a manageable process. Embrace these practices, and you’ll keep your modded game worlds thriving through every new patch the developers throw your way.