


How do I confirm my gaming monitor’s refresh rate is set correctly in Windows for peak FPS?
Understanding Refresh Rate and Its Impact on Gaming
For PC gamers, a high refresh rate monitor is a significant investment aimed at achieving buttery-smooth visuals and a more responsive gaming experience. However, simply owning a high refresh rate monitor isn’t enough; it must be correctly configured within Windows to unlock its full potential. If your monitor’s refresh rate is not set to its native maximum, you’re missing out on peak Frames Per Second (FPS) and the visual fluidity you paid for.
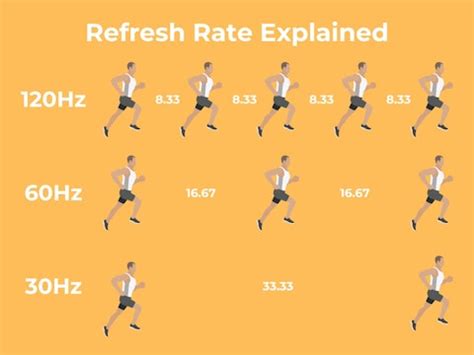
The refresh rate, measured in Hertz (Hz), indicates how many times your monitor updates its image per second. A 144Hz monitor refreshes 144 times per second, while a 60Hz monitor does so 60 times. Higher refresh rates reduce input lag and motion blur, making fast-paced games feel more fluid and giving you a competitive edge. This guide will walk you through confirming and adjusting your monitor’s refresh rate in Windows.
Method 1: Checking and Changing in Windows Display Settings
The most straightforward way to verify and adjust your refresh rate is directly through Windows’ built-in display settings.
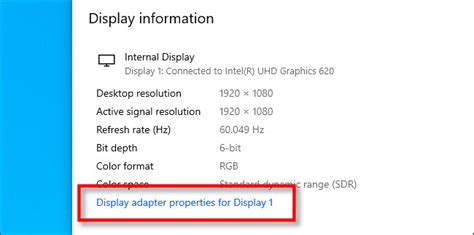
- Right-click on your desktop and select ‘Display settings’.
- Scroll down to the ‘Multiple displays’ section and click on ‘Advanced display settings’. If you have multiple monitors, ensure you select the correct gaming monitor from the dropdown menu at the top.
- In the ‘Advanced display settings’ window, locate the ‘Refresh rate’ dropdown menu.
- Here, you will see a list of available refresh rates for your monitor. Select the highest available refresh rate (e.g., 144Hz, 165Hz, 240Hz).
- Click ‘Apply’ or ‘Keep changes’ to confirm. Your screen may flicker briefly as the change is applied. If the screen goes black and doesn’t return, wait 15 seconds, and Windows will revert to the previous setting.
Method 2: Using Your Graphics Card Control Panel (NVIDIA/AMD)
Both NVIDIA and AMD provide their own control panels that offer more granular control over display settings, including refresh rate, and can sometimes resolve issues that Windows settings might not.
For NVIDIA Users:
- Right-click on your desktop and select ‘NVIDIA Control Panel’.
- In the left-hand pane, under ‘Display’, click on ‘Change resolution’.
- Select your gaming monitor from the dropdown menu.
- Scroll down to the ‘Refresh rate’ dropdown menu. Choose the highest available refresh rate under the ‘PC’ resolutions section (not the ‘HD, SD’ section, as these often cap at 60Hz).
- Click ‘Apply’.
For AMD Users:
- Right-click on your desktop and select ‘AMD Radeon Software’ or ‘AMD Catalyst Control Center’.
- Navigate to the ‘Display’ tab or section.
- Look for options related to ‘Display Specs’ or ‘Custom Resolutions’.
- Find the refresh rate setting for your monitor and select the highest option.
- Apply the changes.
Method 3: Verifying with Your Monitor’s On-Screen Display (OSD)
Many gaming monitors include an On-Screen Display (OSD) that can show you real-time information about the current input, resolution, and refresh rate. This is an excellent way to confirm that the settings you applied in Windows or your GPU control panel are actually being received and utilized by the monitor itself.
- Press the physical buttons on your monitor (usually on the bottom or back) to open the OSD menu.
- Navigate to a section typically labeled ‘Information’, ‘System Info’, ‘Display Info’, or similar.
- Look for a parameter that indicates the current refresh rate (e.g., ‘Current Mode: 2560×1440 @ 144Hz’).
- If the OSD shows a lower refresh rate than you expect, it indicates a mismatch that needs further troubleshooting, such as checking your display cable (DisplayPort is recommended for high refresh rates) or graphics card drivers.
Method 4: In-Game Settings and Verification Tools
While most games automatically adopt your system’s refresh rate, some offer in-game display settings where you can specifically choose the refresh rate. Always check these settings if you feel your game isn’t as smooth as it should be.
Additionally, you can use online tools or software to verify your refresh rate in real-time:
- UFO Test: Websites like TestUFO provide an immediate visual test of your monitor’s refresh rate. Just navigate to the site, and it will automatically detect and display your current refresh rate.
- FPS Counters: Many games have built-in FPS counters, or you can use overlays from Steam, NVIDIA GeForce Experience, or AMD Radeon Software. While these show FPS, not refresh rate, seeing an FPS value consistently capped significantly below your monitor’s refresh rate might indicate an issue.

Troubleshooting Common Refresh Rate Issues
- Incorrect Cable: Ensure you’re using a DisplayPort cable or a high-speed HDMI 2.0 (or newer) cable. Older HDMI versions might not support higher refresh rates at certain resolutions.
- Outdated Drivers: Make sure your graphics card drivers are up to date. Visit NVIDIA or AMD’s official websites to download the latest drivers.
- Monitor Drivers: While less common for refresh rate issues, installing the specific drivers for your monitor (if available from the manufacturer’s website) can sometimes help.
- Custom Resolutions: If you’ve created custom resolutions, ensure they haven’t inadvertently limited your refresh rate.
- Display Scaling: In some cases, display scaling settings or older GPU drivers can cause issues. Resetting display settings to default can help.
Conclusion
Taking a few moments to confirm and correctly set your gaming monitor’s refresh rate in Windows is a fundamental step to ensure you’re getting the best possible performance and visual experience. By following these methods, you can unlock the full potential of your hardware, enjoy smoother gameplay, and gain a competitive advantage in your favorite titles.


